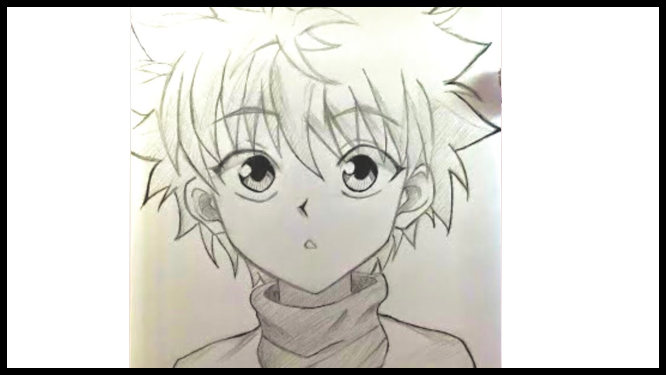
How to Draw Killua Zoldyck from Hunter X If you’re familiar with the story of Hunter X, then you know that Killua is an assassin who’s never had friends or family due to the occupation of his father and brother.
But now that he’s part of Gon’s team, it looks like he might start ope. Follow along to learn how to draw Killua Zoldyck from Hunter X
OR
Learn how to draw Killua from Hunter X in this step-by-step drawing tutorial. Follow along with the series of pictures and easily recreate this cartoon character with the help of our detailed instructions.
Step by Step Guide on How to Draw Killua from Hunter X
Contents
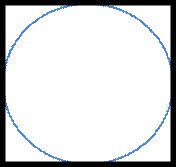
Start with a Circle
First, draw a circle for Killua’s head using a compass or by tracing around a circular object of equal size.
This should be slightly bigger than you want your finished product to be.
The circle shouldn’t have an outline—it should just be one filled-in shape, but keep in mind that it will get smaller as you move forward with your drawing, so don’t make it too big!
Some people may find it easier to trace around something before filling in and enlarging their circles.
To draw Killua’s body, begin by drawing a large circs is where his head will be.
Next, draw an even smaller circle inside of it; these will be guidelines for his eyes.
Then, add two large ovals to represent his upper body and shoulder area.
Draw small lines on either side of each oval to indicate where he will later have and hands.
On either side of his face, add three lines that slope down at almost a right angle.
These are meant to show that he has ears sticking out from behind his hair—long and elf-like!
Add details in the body
Draw outline for arms
Like any drawing, you’ll start with an outline of your subject.
To make sure that both arms are anatomically correct, draw them out at an angle from your initial body line.
First, draw out an A shape for one of his arms. This will be used as a guideline for drawing his arm later on.
It’s very important that both arms are exactly identical; otherwise, it’ll look strange when you’re done. (Keep in mind that I’m right-handed and he’s left-handed).
Then, draw out the guidelines shown below: Using these guides, draw out Killua’s right arm so that it looks exactly like his left arm!
Make sure they match!
It may seem boring now but we are sure that it will make your life much easier later on if they’re identical now.
Once you’ve drawn it out nice and neatly erase your guidelines so we can move on to drawing his hands.
Draw outline for hands
The main characteristic of how to draw Killua is his hands.
They are unique because he has a pinky finger on each hand.
Most people would not be able to tell, but it does exist.
That is what makes him so special as a character and that is why it needs to be included in your picture of him.
You want every aspect of his body that makes him recognizable and really allows you to get into character by drawing Killua Zoldyck.
What you need to do is start by finding all the key parts of his hands and then place them accordingly on top of your own hands so you can figure out where they go and where they need to be placed on top of his own fingers.
Draw outline for feets
Use your pencil and get a blank sheet of paper.
First, draw out his foot by following along with step 1.
His feet look like regular feet so it is pretty easy to draw them.
After you have drawn one foot, move on to step 2 and draw another one that looks exactly like the first one. This will make it easier for you if you want to trace it with your pencil later on.
Draw outline for legs
Place a ruler in between your thumb and index finger on each hand and hold it vertically.
Place your pencil on top of your fingers so that it is pointing down at an angle.
Begin drawing a small line at one end of your vertical line, working up and down until you have a thick black outline for each leg.
Remember to make them as wide as possible, as short legs are one of Killua’s traits.
This process should create two identical, but slightly smaller rectangles.
When you are finished, erase any excess black lines with an eraser so that they do not show up when you begin coloring in the legs.
Repeat these steps for both legs on Monbody.
Draw outline for hairs
Hairs are an essential element in drawing someone, but it’s not as simple as it looks.
Sometimes a single hair strand can make or break a character design.
It’s important to figure out how many hairs you want each part of your character’s head to have and where they should be placed for both functionality and aesthetics.
To make sure everything is where it should be, outline your main character’s hair; use basic shapes for things like sharp and ovals shape when doing so.
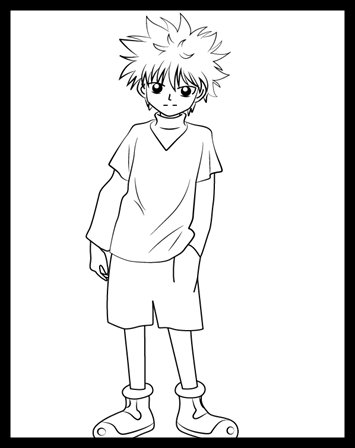
Draw Outfit
First, we’ll need to draw out an outline for his shoulders and shirt.
He has a very relaxed stance, which is why we don’t need any more detail than a straight line for his shoulders.
However, these outlines will serve as references as we begin adding muscles and shading.
At some point in your career as an artist, you may want to try creating more detailed sketches with even greater precision before inking them on paper, but for now, feel free to draw simple shapes as you see in the image given below.
Like all Gon’s attire, Killua’s outfit is just a t-shirt with shorts.
But its odd proportions and color scheme make it worth breaking down in detail.
For starters, it looks like his pants are about four sizes too big for him—while his head looks like it could fit in a three-inch box, his legs appear nearly three times that size.
Also, note how long those shirt sleeves are! And the weirdest of all is that white number printed on his chest.
How to Draw Killua hand and Feet
Hold your pencil and focus on drawing one hand.
Don’t worry about connecting it to another part of your drawing; just make sure it looks like a hand by using your pencil.
Drawing hands can be difficult because we often expect them to look like ours, but keep in mind that every person has different features and proportions.
The second you try to draw something too specific, like an exact copy of someone else’s hand, you run into trouble because there are always variations.
How to Draw Killua legs and shoes
Legs and shoes seem to be a lot of people’s stumbling blocks when drawing Killua.
However, they don’t have to be!
There are some cool things you can do with his legs that’ll make them look so much better.
First of all, if you’re drawing her from a side view, like our drawing here, then you’ve to draw short lines for his ankles/shoes.
Then draw more curved lines for where each part of her foot would hit the shoe.
Make sure that there is shadowing around each line (where it meets with other parts) so that it looks kind of three-dimensional; don’t forget about adding an ankle bone on both sides as well!
How to Draw Killua Hairs
Since you have a picture to work with, the hardest part of drawing Killua is figuring out how his hairs are placed and curled.
As you can see in the picture below he has a lot of hair.
How could we possibly draw it all?
Instead, focus on his fringe first because it’s one of his more prominent features.
Now that we’ve decided on how to approach hair, let’s get started!
For now, use your black pen to sketch out an oval for your face and a circle for your hair.
Leave some space between them so you can add detail later.
How to Draw Killua Eyes
In general, eyes are one of the most important features in drawing anime-style characters.
Large anime eyes can convey innocence or surprise and small eyes can give a cold and aloof impression.
Eyes come in many shapes—from circular to almond, slanted to diagonal—but there are certain tricks that you should be aware of when drawing them.
When drawing Killua’s eye, use lightly shading around his iris.
This will help make it look more realistic and also draw up the nose and lips.
If you’re having trouble with placing shadows correctly, try looking at some reference photos of real eyes; they might just look strange at first but they’ll begin making sense after a while!
Bold Outlines
Next, you need to add bold outlines so that you can see your drawing more clearly.
You don’t have to trace your drawing.
Instead, just use a pencil to connect all of your desired lines.
It should look something like what is shown below.
Try not to press too hard when doing this as it will create darker areas on your paper, which you don’t want.
If you go slowly enough and light enough, there shouldn’t be any dark marks left behind at all.
Remember: if you go back in and make modifications later on, those lines will stay!
Conclusion to Killua’s Drawing
This way to draw Killua is easy and simple.
You can easily draw it yourself at home.
Give it a try.
If you like drawing naruto characters then it’s a good tutorial for you.
Practice more to gain perfection in your artwork.
It would be great if you will share your drawings on our website and comment down below about them.
We are sure that many people would love to see your masterpiece of artwork. Have fun.


")
 - Drawinganimeandmanga.com")
")
")