I know it might sound a little silly, but drawing manga is one of the easiest things you can learn how to do.
If you’re interested in drawing Kurapika, make sure you follow this comprehensive guide from the start.
Drawing manga follows art principles and skills, so follow our blueprint for success to draw your own fabulous friends.
Let’s get started with the Kurapika Drawing without further ado.
How to Draw Kurapika from Hunter X Hunter
Contents
Draw Outline for the Head
To draw the Kurapika’s head, we need to start with a big circle.
This circle should be very big so it can host other features of the head.
Draw a straight line (vertical lines) that cross the middle of the circle; you start the vertical line from the top of the circle and make sure it comes out of the bottom of the circle.
This line under the circle must also be a bit long so that it can serve as the basics of the jaw, neck and mouth can also fix well.
Draw a horizontal line that crosses from the left to right of the circle; this vertical must be drawn close to the bottom of the circle so that the space under the vertical line (inside the circle) carries one-third or 1/3 of the whole circle.
Draw another small horizontal line at the center of the vertical line that is at the bottom of the big circle.
With this, other features of the head can be comfortably fixed.
Outline the Neck
Kurapika’s neck is attached to his jaw.
To draw the neck, you have to draw the jaw first.
To draw the jaw, draw a curve from the right side of the big circle to the small horizontal line at the bottom of the circle.
Draw another curve from the left side of the big circle to the small horizontal line; these two curves, must meet at the center of the horizontal which joins to the vertical line that leads to the head, make sure the joining of the two curves forms the shape of the jaw.
Now to draw the neck, as I said earlier, the neck is attached to the jaw; draw a curved vertical line that runs from the left side of the jaw, so it curves downward to form the shoulder.
Draw another curved vertical line that runs from the right side of the jaw so that it also curves from the other part of the shoulder.
Outline the Eyelid
To draw the eyelids, draw a concave curve above the location for the eyes, this curve’s edges should be resting on the horizontal line inside the circles, with this you are done with your eyelids, make sure you draw the left and right eyelids the same way.
Outline the Nose
The nose is one of the simplest parts in Kurapika drawing that can be drawn without an error.
The nose is under the eyes, above the mouth, and beside the vertical line (straight line) that runs from the head.
To draw the nose, draw a small vertical line, this line should be at the center of the one-third of the big circle which was divided by the horizontal line.
With this, you are done with the nose, and you can move to the next step.
Outline the Eyebrow
Drawing Kurapika eyebrows is also very simple to do; draw a horizontally bent line on top of the eyelids but note that the eyebrow for the right eye seems longer than that of his left eye because the right eye is bigger than the left eye.
Outline the Mouth
The mouth is another vital part of Kurapika’s body that can we can easily draw out without any error, his mouth is attached to the bottom of the big circle.
Kurapika Jaw drawing
To draw the jaw, draw a curve from the right side of the big circle to the small horizontal line at the bottom of the circle.
And make another curve from the left side of the big circle to the small horizontal line; these two curves should meet at the center of the horizontal which joins to the vertical line that leads to the head.
Make sure the joining of the two curves forms the shape of the jaw. The jaw should not be too long so that his collar can easily be fixed.
Kurapika Neck & Shoulder Drawing
To draw the neck, draw a curved vertical line that runs from the left side of the jaw, so it curves downward to form the left shoulder.
Draw another curved vertical line that runs from the right side of the jaw so that it also curves to form the right shoulder.
We can see the shoulder is an elongation of the neck.
Begin To Draw the Hair
To draw the hair, you need to begin with a concave curve above the bigger circle which serves as the head; this curve should start from the left jaw and end at the right jaw.
The right side of the concave should not be as close as the left side, so it looks like the hair is shifted to the right side of the head.
The starting of the hair (from the jaw) shows the length of the hair.
Draw a horizontal line from the right side of the head to the vertical line that runs from the top of the head, and draw a curve at the left side of the circle so that it runs from the top of the head(inside) to the side of the left eye. This is the first step to drawing the hair.
Draw the Pupil, Iris, & Lower Eyelid
Pupils, iris, and eyelids are the main features of the face, and they make the eyes.
To draw the pupil, you need to start with small curves inside the circle that you drew for the eyes; these curves should be facing the right side of the head, and the small curves should be at the top of the circle (eyes).
Draw a convex at the bottom of the small curves in shape, so it looks like beans (doubled convex), this is his pupils.
To draw the iris, trace the upper eyelid so it curves the more; from the joint of the upper eyelid, draw a small vertical line down the eyes, so it makes the iris of his eyes more obvious, but the iris is not completed yet without the lower eyelid.
So there is a need to draw the lower lid to make the iris accurate.
It is very easy to draw the lower eyelid because it looks like the continuation of the line that made up the iris.
Draw a slightly bent horizontal line at the bottom of the circle (eyes), and this is your lower eyelid.
Continue Drawing the Hair
Kurapika’s hair is one of the most important parts of his body therefore, it takes time and requires patience.
To continue the hair from where we stopped, draw a zigzag from the big circle (head) passing through the curve above his head to the side of the curve that leads to the jaw.
Draw some vertical lines meeting each other to form a sharp edge at the bottom of the curve and a big circle(head), make sure these sharp edges get to the neck of his tabard because it shows how long Kurapika’s hair is.
Draw a vertical line crossing the horizontal line (you drew from the circle of the head to the vertical line), and draw a vertical line from the same horizontal line crossing the right eyebrow.
Draw another vertical line from this same horizontal line crossing the vertical line that divided the big circle(head) and pointing towards the left eye.
Finish this step by drawing a vertical line from the bottom of the first vertical line you drew and let it cross the vertical line that runs through the head meeting the end of the vertical line that is close to the left eye so it forms an edge.
With this, you are done with this step.
Draw the Neck of His Tabard
Kurapika is wearing a tabard; the tabard is a sleeveless garment with innerwear.
To draw the neck of the tabard, draw a cylindrical circle at the neck of Kurapika so that the ends of this cylindrical circle are joined to the two sides of his neck; this cylindrical circle should pass below the jaw and at the center of the neck.
Draw straight lines (vertical lines) at the two sides of the cylindrical circle.
This straight line must not be too long.
So it must rest on his shoulders, and draw a slightly curved horizontal line from the end of one straight line to the other; this makes the top of the tabard look real.
And draw another slightly curved horizontal line at the bottom of the cylindrical circle so that the top of the tabard can look like it.
Draw a small square shape at the bottom of the vertical line that runs from the big circle (head) to the neck, and this square is the front of the bow tie, which is attached to the tabard, at the sides of the square.
Draw another rectangular shape facing down, so it looks like a butterfly.
Draw small horizontal lines at the top of the square, and draw a vertical line from the horizontal lines to the rectangular shape so the bow tie can look more realistic.
Draw the Shoulder of His Tabard
To draw the shoulder for the right hand, trace down the basic line you already drew for the shoulder; this line also forms the upper part of the right arm that carries the cloth.
To draw the shoulder for the left hand here, draw a slightly curved straight line alongside the basic line you already drew for the shoulder.
Make sure this line isn’t too curved so it can align with an already established line for the left shoulder.
To draw the cloth on his right shoulder, draw a vertical line from the top of the angle (which the shoulder was curved to form the arm) downward, and draw another vertical line close to the center of the shoulder downward; these two straight lines from the helm of his cloth.
To draw the cloth on his left hand, draw a vertical line from the top of the angle (which the shoulder was curved to form the left arm) downward.
Draw another vertical line close to the center of the shoulder downward, and draw a slightly curved line from the first straight line aligning it to the line that makes the left arm, this shows the inner part of the cloth
To complete his cloth, draw vertical lines from the slight curved horizontal line (you drew under the cylindrical circle) downward, ensuring it passes through the sides of the square (that forms the bow tie); this shows the button area of the cloth even if the buttons are not showing.
You are done with Kurapika’s shoulder drawing and the cloth covering his shoulder with all these.
Kurapika’s Complete Hair Drawing
Kurapika hair has a lot of sharp edges, and to make this a reality, you need to continue adding your sharp edges by using vertical lines.
From where you stopped, draw a vertical line from the right side of the head (inside the curve on top of the head) to the eyes.
Make sure the line touches the pupil of the left eye, and draw a vertical line from the center of the vertical line that runs from the top of the head and joins it to the end of the first vertical line, so it forms an edge on the left eyes.
Draw a vertical line from the end of the horizontal line that crosses the right side of the head, aligning it to the line that crosses the horizontal, and draw a curve from the right side of the head(top) to the right eye touching the iris of the eye.
Draw another curve from the horizontal line that crosses the right side of the head to the upper eyelid of the right eye.
Draw a long curve from the zigzag that you drew at the right side of the head to the right jaw passing through the middle of the big circle (head) and the curve at the top of the head.
Draw additional sharp edges to the sides of the jaw to show how full his hair is; the sharp edges at this stage must touch the neck.
Now it’s time to make out edges from the lines you’ve drawn to complete Kurapika’s hair drawing.
Draw a straight line at the top of the right side of the head, aligning it with the curve over the head.
Draw two vertical lines coming together to form an edge at the side of the right eye, so it forms the hair beside the lower eyelid.
Draw another two vertical lines forming an edge at the top of the right eye, so it touches the upper eyelid.
Draw a straight line from the top of the big curve to the left side of the head.
Draw two vertically curved lines forming an edge, so it touches the iris of his left eye.
To finish the hair, draw more vertically curved lines at the sides of the head and big curves to completely form all the edges of the hair without missing any part or step.
You can also add the hair edges to his face close to his eyes. By doing all these, you are done with the hair.
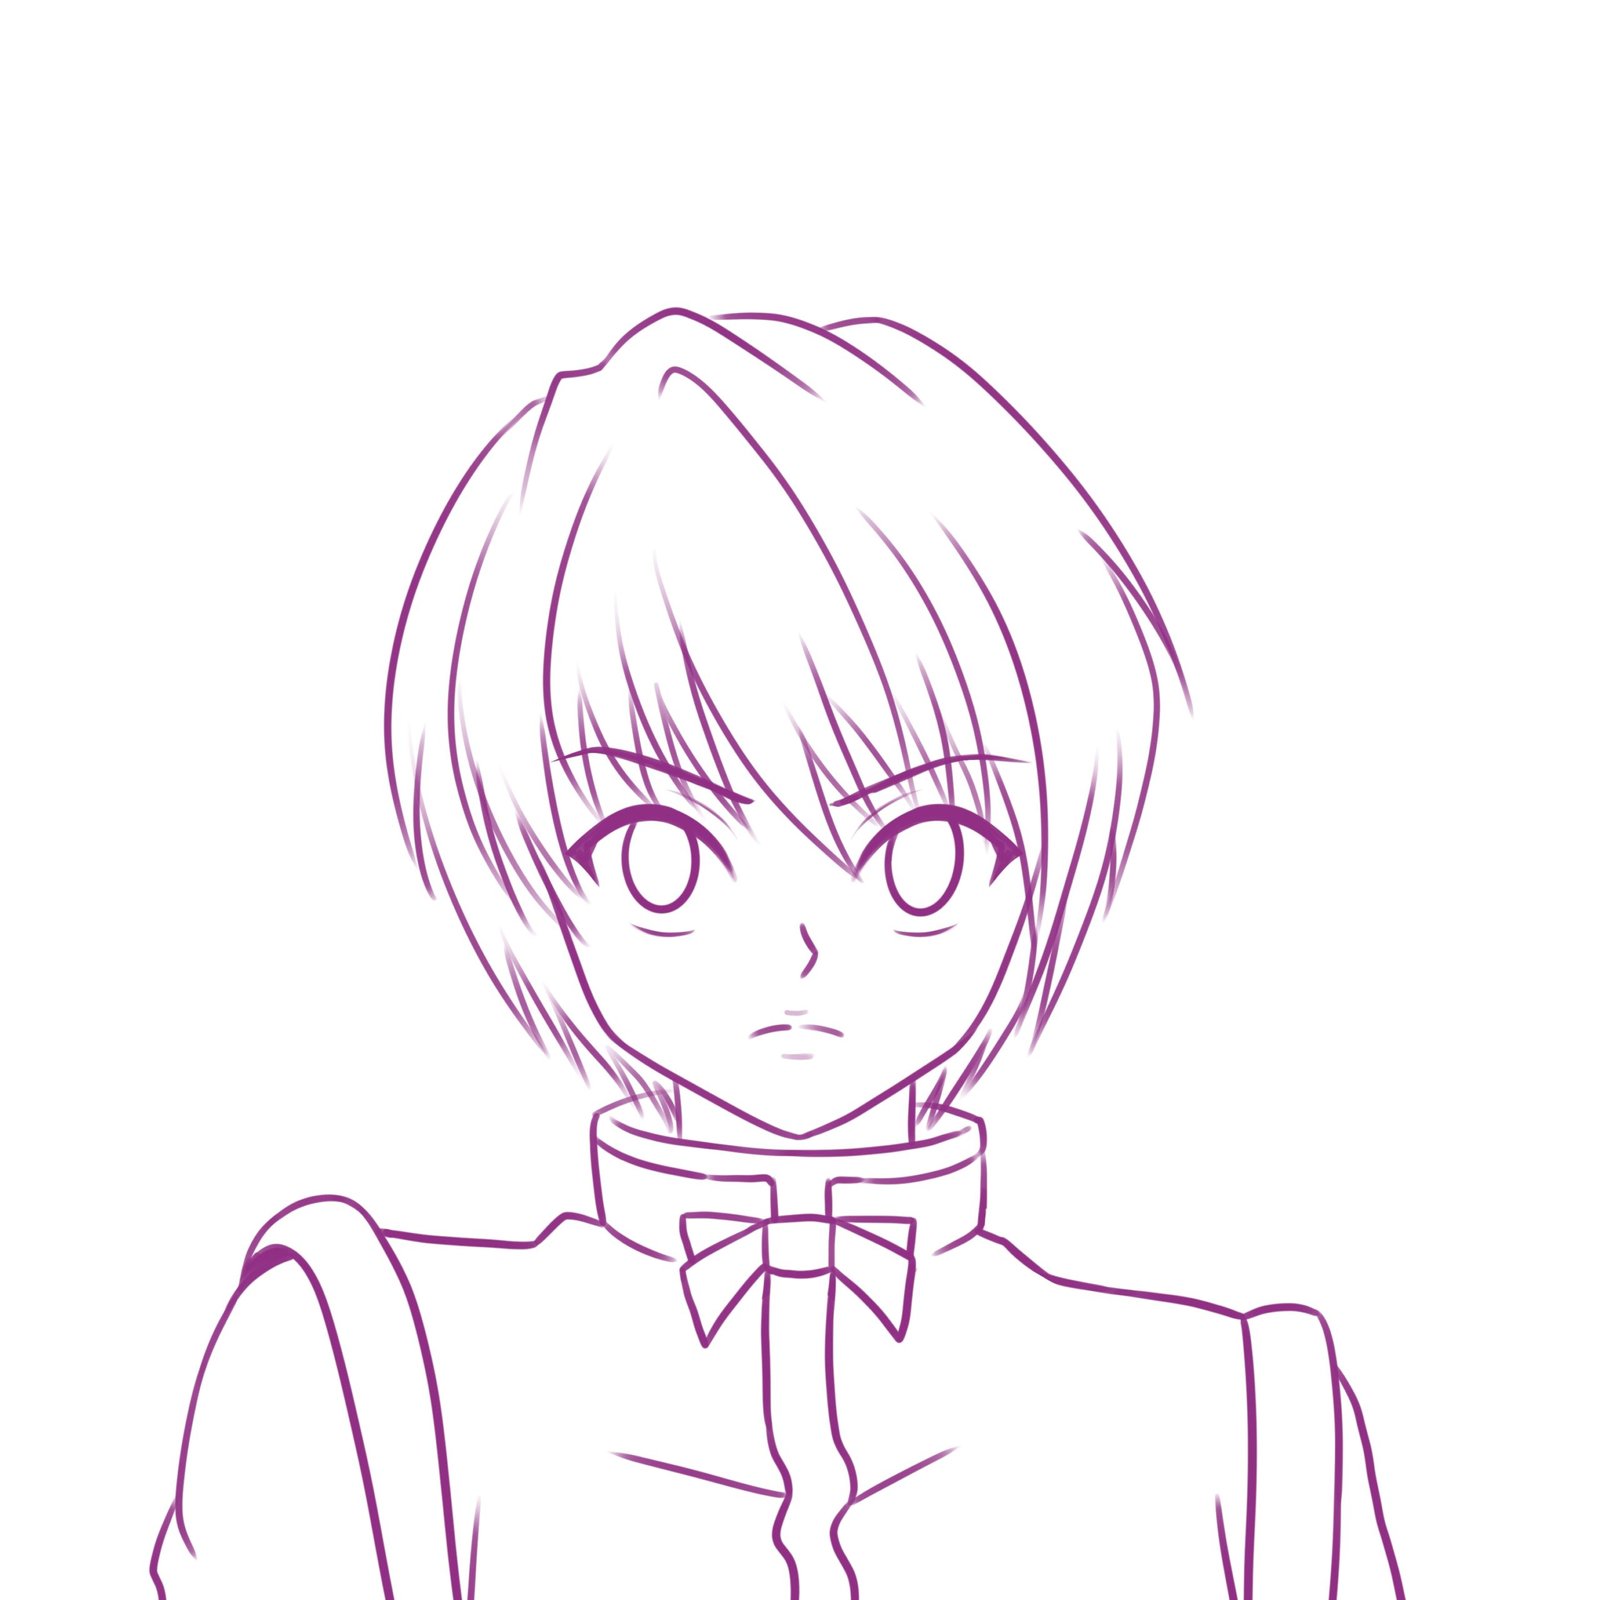
Enhance the Outlines
Trace out the hair with a thick line so the hair can come out very good, trace out the upper eyelids with a very thick line which you can easily add shadings to the upper eyelids.
Trace out the lower eyelids, also trace out his eyebrows, and finally, trace out the eye pupils so that the bean shape of the pupils is made obvious, trace out the nose, and trace out the mouth.
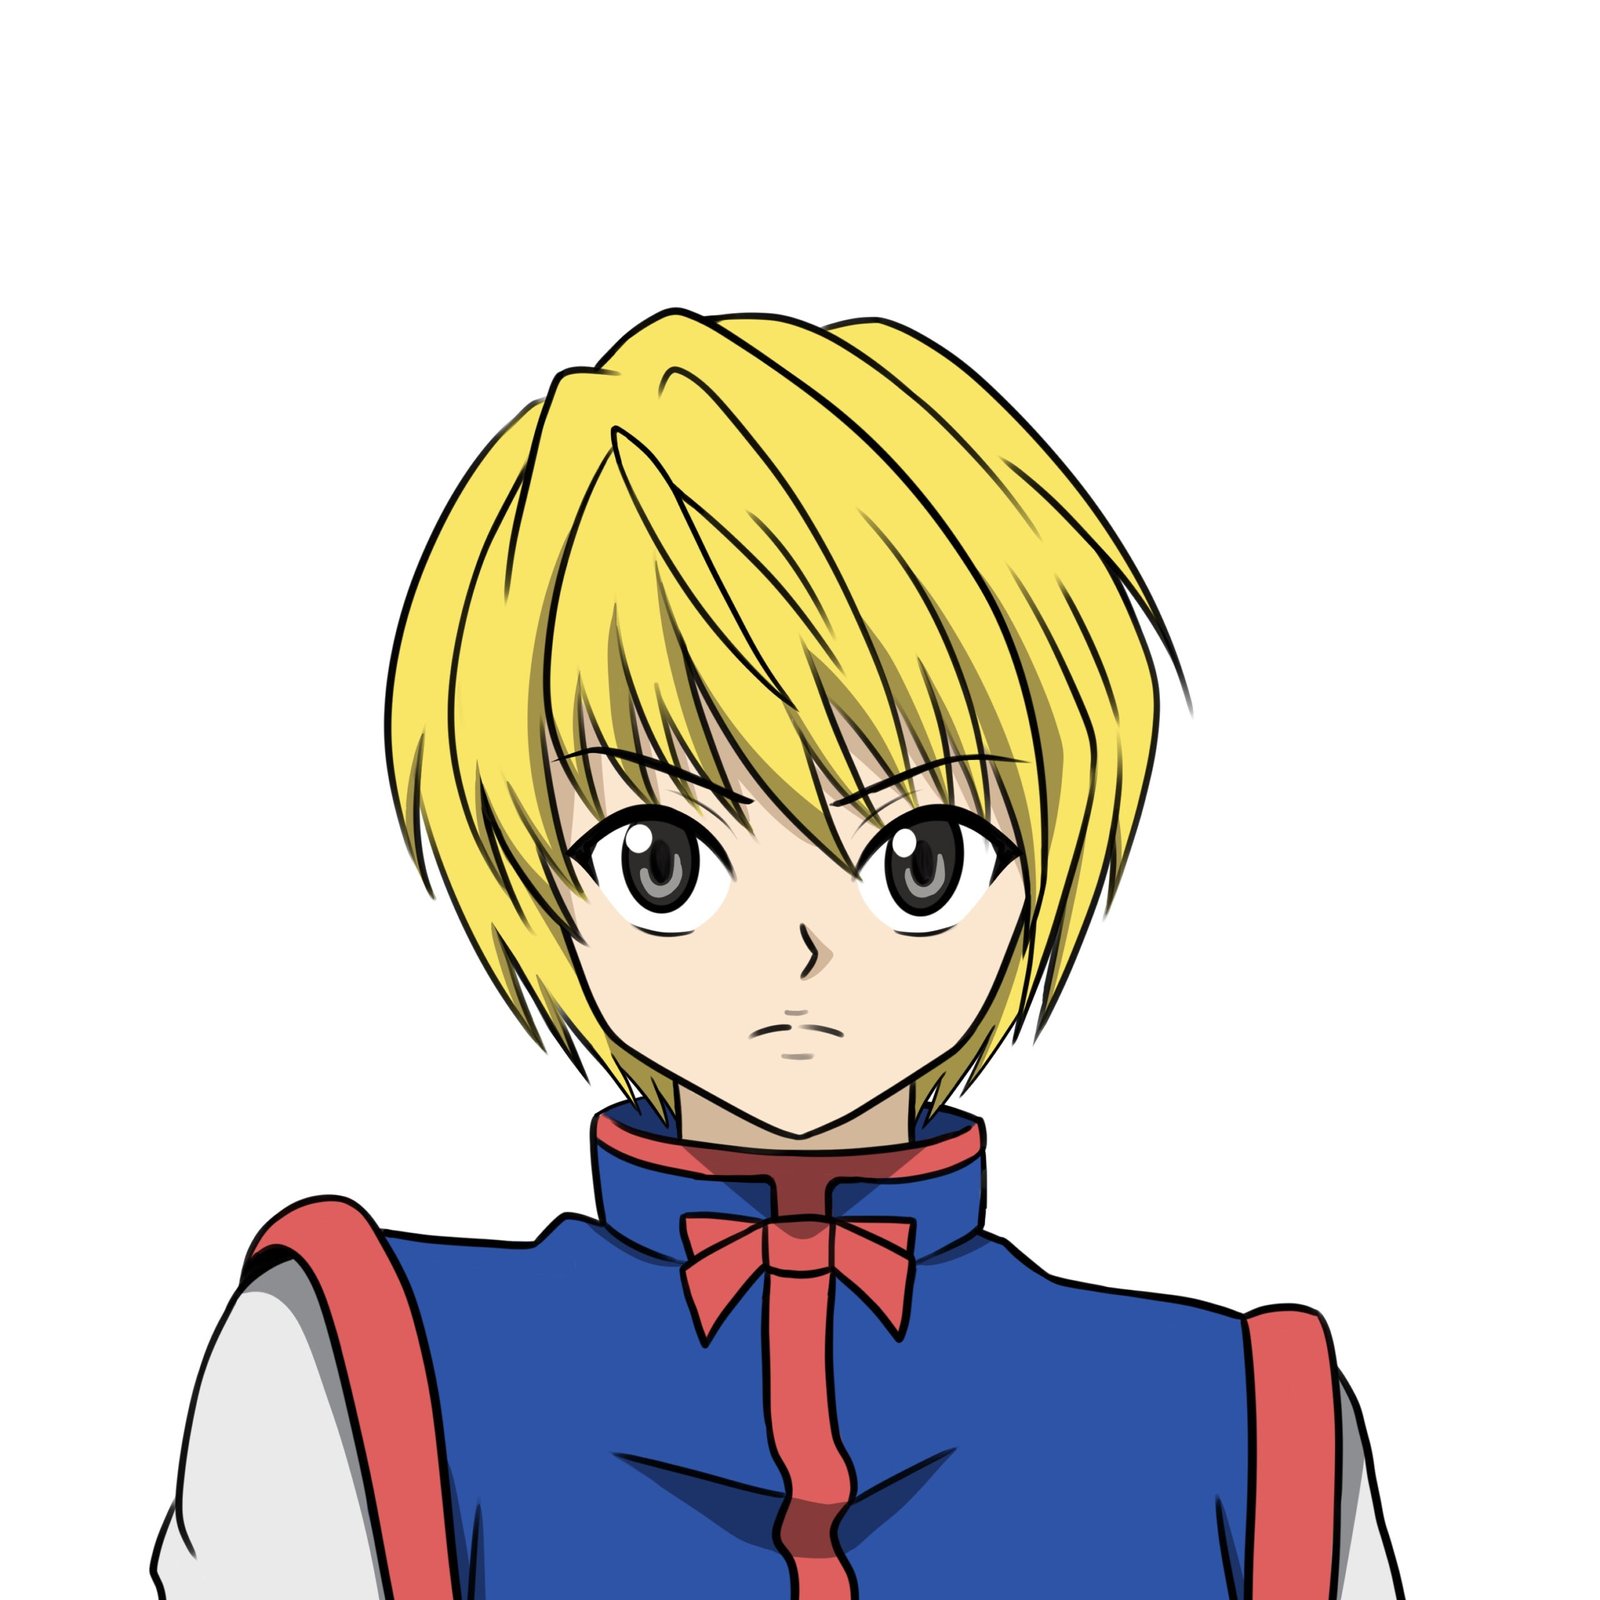
To color the outlines, you must be very careful; and the hair is yellow while the traces of his hair remains black, the pupils of his eyes are black and has an ash color inside them.
The iris remains white, and Kurapika is fair in complexion; therefore, his face and neck must have the same complexion.
With all these, you are done with the face enhancement.
Enhance The Outfit
Kurapika is wearing a tabard with the color blue and blush (family of red).
The upper part of the tabard is colored blush and the rest blue, the bow tie is colored blush, and the button line is colored blush, so it matches or blends with the bow tie, the helm of the tabard Is colored blush, and his arms are colored ash while the rest of the cloth is colored blue.
Tace out the necessary part of the outfit to make it look more pragmatic and attractive.
Conclusion To Kurapika Drawing
Now you should be able to draw Kurapika without any problem; all it needed from you is to get ready the necessary equipment which are pencils, an eraser, your paper, a ruler to make a perfectly straight line, and your color, you can as well get the image of Kurapika to know if what you are drawing is correct.
It’s time to try out something new, and I am sure you are good to go with these steps.