The Demon Slayer Armed with his sword and an enormous broad shield, the Demon Slayer will protect you from evil spirits! With this detailed tutorial, you’ll learn Zenitsu Agatsuma Drawing in no time!
Follow along with us and we’ll show you Zenitsu Agatsuma’s drawing from the popular manga series Demon Slayer: Kimetsu no Yaiba.
Material Required
Contents
If you have a picture of Zenitsu it’ll be good, if not, no biggie.
If you don’t want to buy sketch paper and markers, that’s okay.
You can use any type of paper and pencils are fine too.
However, we recommend using sketch paper and different color markers because they make your drawing more organized and easier to view.
As far as brushes go, we’re pretty sure you can use anything that is a paintbrush or pencil brush so long as it’s around 2 inches wide or wider (for hair).
So yeah we think that covers everything for now.
How to Draw Zenitsu Step by Step
Draw Circle
The first step for beginners is always how to draw a circle.
The circle indicates the head, body, and arms of the character.
Before start drawing how to draw Zenitsu, you should get used to drawing circles for practice.
Do not rush up and do not press too hard on your pencil or pen when you are drawing on paper.
It will ruin your paper surface and make uneven lines, causing misshaped circles when creating how-to-draw Zenitsu.
Practice more times so that you can learn it well if you are learning how to draw Zenitsu for the first time.
Add Details in Circle
Drawing Zenitsu from Agatsuma Demon Slayer is simple with a few tips and techniques.
It’s not just about how you draw his exterior, but more about translating what you want him to say into his look, and even how he feels.
The process of drawing Zenitsu may appear overwhelming at first, but once you start it’s smooth sailing!
So grab your pencils and have fun with these step-by-step instructions!
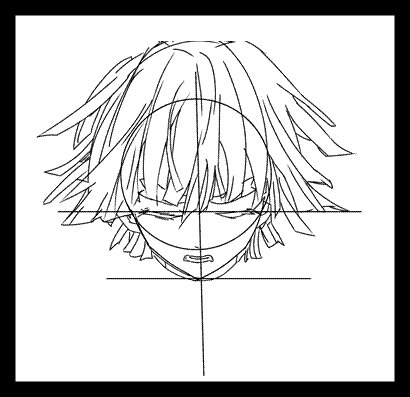
To begin with the body, you must first create the fundamental guidelines, which consist of a circle, a vertical straight line, and two horizontal straight lines that are parallel to each other in the center of the drawing.
Draw Facial Details
Draw Ears
Before you draw in his ears, sketch an oval slightly bigger than his head on either side of his hair.
The left ear should be at a 90-degree angle from his face, and its bottom edge should be above and level with his eyes.
The right ear should be pointed up slightly more, positioned just beneath and behind his eye.
These ears don’t have to be perfectly shaped as we’ll fix them later.
The left ear should be at a 90-degree angle from his face, and its bottom edge should be above and level with his eyes.
The right ear should be pointed up slightly more, positioned just beneath and behind his eye.
These ears don’t have to be perfectly shaped as we’ll fix them later.
Draw Eyes
Agatsuma’s eyes are one of his most distinct features and you must get them right.
To make your own, start with a circle for each eye and draw a half-circle on top of each for his eyebrows.
Next, using small dots, create an iris inside each half-circle as well as a curved line around each eye for eyelashes.
Now simply add in two straight lines at either side of his face (for where his ears will be) and then fill in all these shapes with black ink to finish off your Zenitsu drawings!
Draw Mouth
Put a small circle at the tip of your nose.
Put two curved lines that end in points on both sides of your face, next to each other.
If you look closely, there should be a little gap between them.
Put a couple more little lines above these lines for nostrils.
Then put two small dots on either side of your nose for eyes and below that, three circles for cheeks with small dashes inside them for mouth corners.
You should now have something that looks like an alien with large eyes and a big smile!
Draw upper neck
First, start with a few simple lines for your upper neck.
Next, draw out his chin and lower lip.
Shade in his mouth then gives him a small jutting chin.
Sketch in his mustache and add more detail to it if you’d like!
You can even give him a beard if you’d like as well.
The possibilities are endless!
Draw Eyebrows
Thick eyebrows are a hallmark of a character in Japanese comics and cartoons.
Eyebrows that are too thick can ruin a character’s facial expressions, so it’s best to draw them lightly at first.
Now we want to put on bold strokes for all of Zenitsu’s eyebrow hairs, using quick upward strokes.
The result should look something like the given in the image below.
Draw Long Hairs
Use a small number of light tones in your Zenitsu drawing.
The hair should belong, and you can illustrate that using long strokes coming out from under her hat.
You want to use light strokes because Zenitsu’s hair is very soft-looking, so if you shade too much it will end up looking hard.
Make sure you focus on keeping everything smooth and blending everything for an even tone across her hair.
A blending tool may come in handy when dealing with these kinds of strokes.
The shading should cover about 50% of her hair length and look a little wavy.
Her fringe hangs just over her eyes, so use lighter tones than the rest of her body for shading on it – don’t make it 100% white either though!
Draw Hands
First, it’s important to remember that like people, all hands are different.
You need to keep in mind that all of your drawings won’t look exactly alike, so don’t be discouraged if you draw a hand and then look back at your reference photo and see some differences.
The biggest difference you should expect is in how thick or thin your character’s fingers are.
For example, our drawing has rather thin fingers when compared with my reference photo.
Next, pay attention to proportion; a finger may be longer than expected or shorter than what you originally drew.
For two drawings of the same hand to match up perfectly, they would have needed to be drawn from life on identical paper.
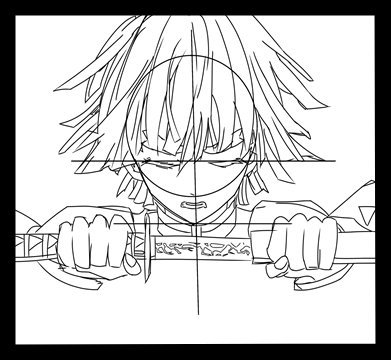
Draw Sword
Follow these steps for a more detailed and refined version of what you drew above.
First, take your 1H sword in both hands.
Next, add some detail and texture to it.
Then, draw his arms holding his weapon.
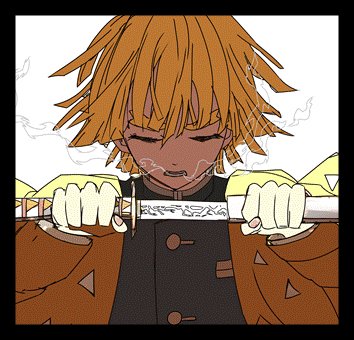
Lastly, add some shading and light with colored pencils or pens to give depth and make your drawing look realistic.
Be careful not to overdo it on details because you don’t want him too cartoony or else it will ruin how awesome he looks!
The finished image is shown below.
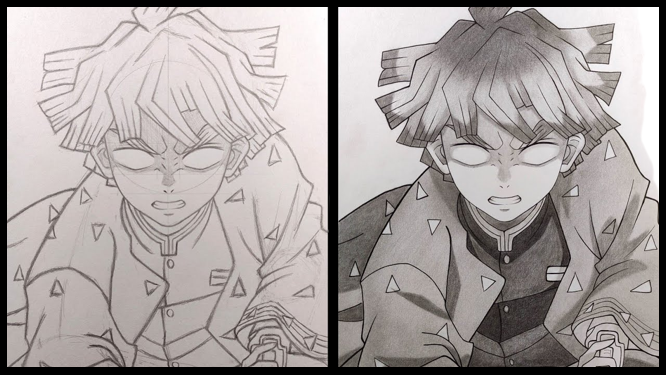
Add Details in the Body
Drawing the rest of Zenitsu’s upper body, as well as his uniform and the details on it, will be required for this step.
As shown in the illustration, you must also draw the smoke effect around his mouth to represent his thunderous breathing as shown in the picture below.
Add Colors
It is also a good idea to plan how you want Zenitsu colored.
Color can make your drawing look even better, but be sure not to add too many colors or it will look very busy and distracting.
Try using only 2-3 colors on your drawing or use 1 bold color with black and white.
It all depends on what you want. Remember that details matter in making good drawings.
Conclusion
This post provides a simple, step-by-step guide on how to draw the character Zenitsu.
If you are a fan of the Zunitsu or you are simply looking to improve your drawing skills, this tutorial is for you.
We hope this tutorial turns out helpful for you.
Please leave a comment below and let us know how you liked it.


")

 Breif & Easy Guide")
")
