Kite was a character from an anime series. To learn Kite drawing as a beginner, you must first do your research to get a picture or image of a Kite from hunter-x-hunter; here, I will show you a few easy steps to quickly adapt Kite drawing while it looks natural.
Let’s get started with the Kite HXH drawing without further ado.
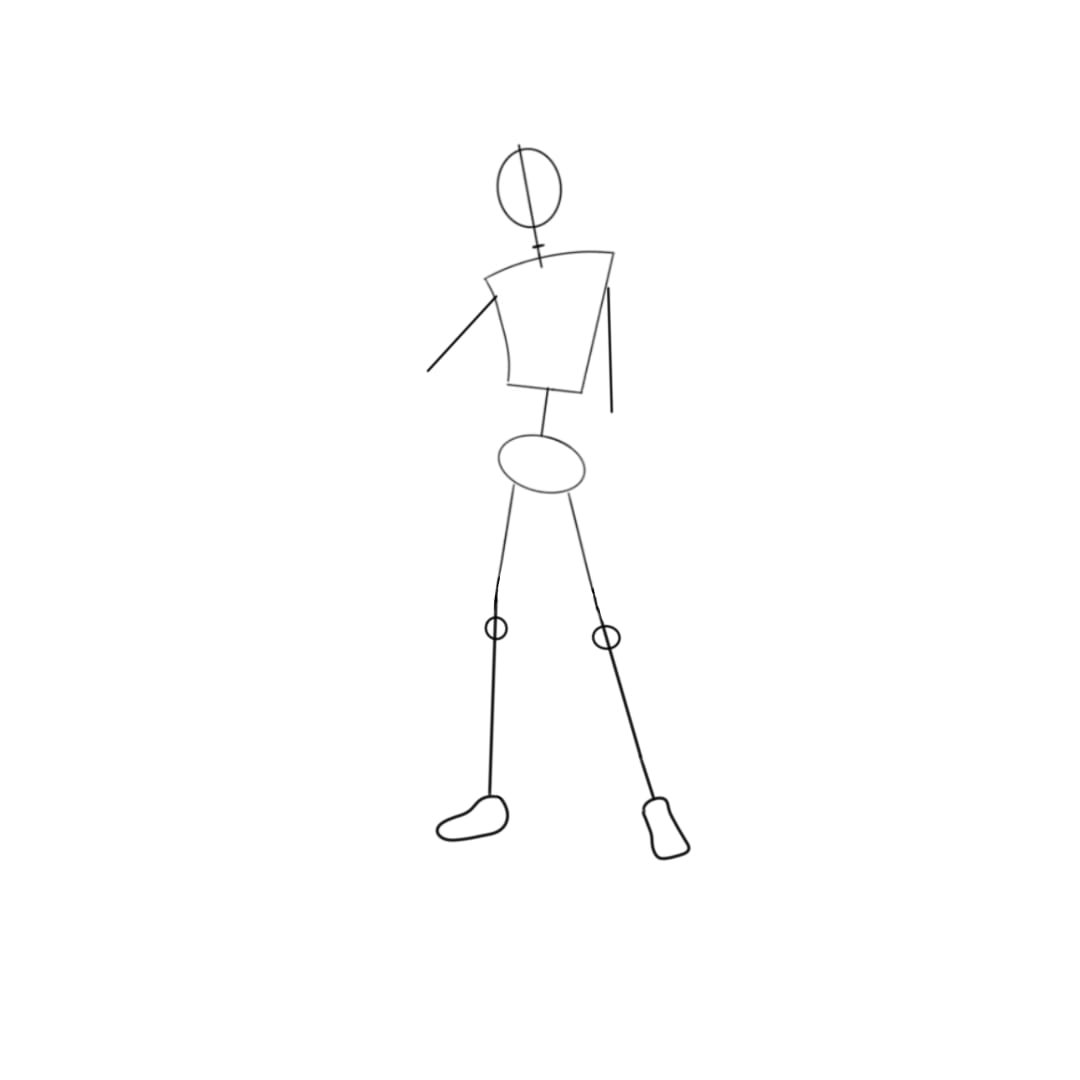
Draw Kite’s Pose
Contents
Begin with a circle & lines
To draw the head, mark out the circle of the head first.
Draw a vertical line that extends outside the head at the center of the circle, and the remaining part of the vertical line that was extended down the circle will serve as the basis for the neck.
Draw a horizontal line on the vertical line which will help in the positioning of the jaw and neck of the head.
Draw outlines for his chest
Make a horizontal curve on the vertical line of the neck (under the horizontal line of the jaw).
Draw a curve on the left side of the horizontal curve (the curve should be facing out) and a slant line on the right side, these are the sides of the body.
Draw a horizontal line joining these curves and lines together, so it forms the proper shape of the chest.
Draw outlines for the arms & hands
To draw his right arm, draw a slant line from the curve of the chest; this is the upper arm for the right arm.
Draw a circle at the end of the slant line; this is the elbow joint of the right arm;
Draw a vertical line from the circle of the elbow pointing towards the direction of the waist, this is the lower arm for the right arm.
For his left arm, draw a straight vertical line from the slant line of the chest, this is the upper arm for the left arm.
Make a circle under the straight line, so it serves as the elbow joint of the left arm.
Draw another straight vertical line under the circle of the elbow, so it serves as the continuation of the first straight line, this is the lower arm for the left arm.
You will know that the left arm is pointing downward, and the right arm is resting on the waist.
Draw a circle under the last line of each arm (lower arm) so that the right hand is attached to the waist and the left hand is pointing down. These circles are the basics of the hand.
Outline the waist
The waist is attached to the upper part of the body (chest) and attached to the legs, which means the waist connects the upper part and the lower part of his body together.
Draw a vertical slant line under the horizontal line; this is the waistline; draw an oval circle under the vertical slant line, so it serves as the waist of the body.
Outline the legs
Kite has a very long leg which makes him more dynamic among the anime’s characters; therefore, you must be extra conscious while drawing the legs.
Draw vertical lines under the oval shape of the waist.
Make sure the lines are separate and not too close, this is the upper part of the legs(thigh).
Draw a circle under these lines, this is the knee joint that connects the upper leg to the lower part of the leg.
Draw another vertical line that seems to slant under these circles so that it serves as the lower part of the leg.
Outline the feet:
Draw oval circles under this vertical line of the legs, and let the oval shape of his right foot point outward toward the right direction of his body while his left leg is pointing or facing downward.
Make the oval shape big enough so it can complement Kite’s body features and because his feet are also big.
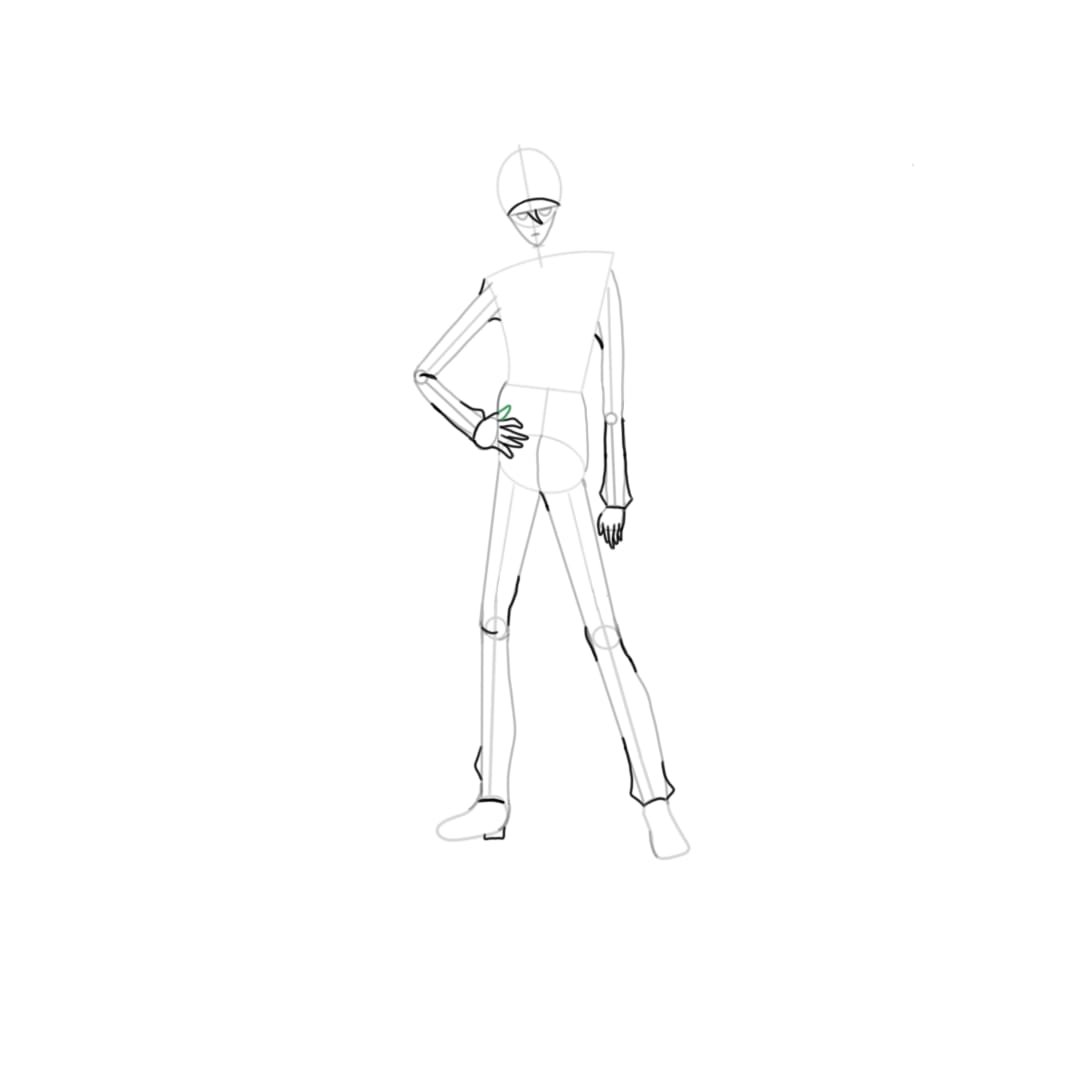
Kite’s Jaw & Neck Drawing
For the jaw, draw two vertical lines that extend out of the circle representing the head and they meet at the center below.
Drawing the neck is also another simple part of the body that can be achieved with a few strokes; the neck is connected to the jaw and the upper part of the body (chest).
Draw vertical lines from the sides of the jaw to the horizontal line that serves as the upper part of the chest so that the vertical line you drew for the basic of the neck appears to be in the middle of the lines, this is Kite neck drawing.
Draw outline for Kite’s eyes and mouth
Kite has two eyes which are pretty big for the average size of the eyes; the eyes are drawn close to the bottom of the circle representing the head, so it appears to be under the horizontal you drew inside the circle of the head.
The eyes are also simple and easy to draw.
Make convex curves under the horizontal line of the jaw so that the vertical line of the neck seems to be in the middle of the convex curve, this is the basis for the eyes.
To draw the mouth, make a small horizontal line under the eyes and inside the jaw so that the horizontal line of the mouth crosses the vertical line you drew for the basic of the neck.
Draw Kite’s Waist, Legs, and Arms
As you already know that the waist connects the upper part of the body to the lower part of the body.
Therefore, make vertical lines from the ends of the horizontal line of the chest to the sides of the oval shape of the waist so that the vertical line of the right side of his waist touches the right hand because the right hand is resting on the waist.
For his right leg, make a vertical line from the side of the oval shape of the waist so that it slightly curves towards the joint of the knee.
Draw another vertical line from the side of the circle of the knee so that it looks like the continuation of the first vertical line till the gets to the oval shape of his right foot.
Draw another vertical line that seems from the middle(under) of the oval shape of the waist so that it also bends towards the circle of the knee to form the proper shape of the right knee.
Continue downward and stop at the feet, this is the right leg.
Use the same approach for his left leg but make sure the lower part of the left leg seems slant so that the legs & posture of the Kite hxh drawing can look natural.
Don’t forget to draw the legs so that the shin will be a bit obvious.
Now you are done with the legs, let’s quickly complete the arms.
To draw the arms, the right arm and the left arm are not in the same position, so you must take your time while drawing these arms.
For his right arm, draw a vertical slant line from the curve of the chest to the side of the circle of the elbow joint.
Draw another vertical slant line from the circle of the elbow to the circle of the hand, so it forms the outer part of the right arm.
Make a vertical line that looks slightly curved from the curve of the chest to the circle of the elbow.
Hence, it forms the exact shape of the upper arm and finishes it with a vertical slant line from the circle of the elbow (so it looks like the continuation of the slightly curved line) to the circle of the hand, so it forms the actual shape of the lower arm of the right hand.
The left arm is straight in position; draw a vertical line from the slant line of the chest (so it passes the side of the circle of the elbow) to the circle of the hand, do this for the other side of the arms so that you can have the actual shape of Kite’s left arm.
With these few approaches, you are done with his arms.
Draw Kite’s Finger
Kite’s fingers are long, the fingers are attached to the circle of the hand, and the right fingers are on the waist while the left fingers are pointing downward.
For the right fingers, make a vertical slant line at the side of the circle and extend it down, so it forms a vertical slant line with an edge on the waist.
Make a horizontal line under the edge and also extend it down, so it forms another edge.
Draw a curve joining these two lines together, so it creates the first finger.
Finish the second finger with a vertically curved line, so it also forms an edge.
Draw the third finger joining to the second one, and add the last finger which is the smallest finger while it’s attached to the circle of the hand.
For the left fingers, draw a curve from the side of the circle of the hand; this curve should be pointing towards the direction of the thigh.
Draw another curve at the back of the curve also facing the same direction, and draw the thumb attached to the curve and join the curves together, so it shows the proper shape of the fingers, you can also add a little curved line at the bottom of the curve.
Hence, it forms the shape of the middle finger.
Draw the Hair on Her Forehead
For this, draw a concave curve on the horizontal line of the jaw so it forms the limit of the hair towards the eyes.
Draw a vertical slant line pointing towards the direction of his left eyes, double the slant line, so it forms a sharp edge like the beak of a bird, this is the hair on the forehead.
Draw Kite’s Cap
For the cap, draw a concave curve on the circle of the head so that the concave curve looks like a semi-circle; this is the upper part of the cap; make curves joining this concave curve to the horizontal line of the jaw, this is the lower part of the cap. This is Kite’s amusing cap.
Draw Kite’s Neck & Sleeve Of Her Top
Kite is wearing a turtle neck cloth.
To draw the neck of the top, draw a horizontal line at the top of the vertical lines of the neck beside the jaw.
Draw a convex curve below the join so that it joins to the horizontal lines.
Draw a line from the hair to the end of the vertical line and finish the neck of her top with a convex curve under the horizontal line of the chest (so it crosses the vertical line of the neck) to form the shape of the upper part of her top.
To draw the sleeve, make a line joining the top of the curve of the chest to the vertical slant line of the arm and add a little under.
Draw a curve at the bottom of the right arm and a little curve under it; you can also trace down the wrist of the hand to the curve under, this is the sleeve for the right hand.
Draw vertical lines from the joint of the left elbow and curve it before it gets to the wrist.
Join the curved end of these vertical lines with a horizontal line of the wrist, and extend the inner vertical line of the arm upward so it shows inside the shape of the chest and traces down the upper part of the slant line of the chest. This is the sleeve for the left hand.
Draw Kite’s Hair
Continue the hair by drawing a very long vertically curved line from the end of the horizontal line of the jaw, double the long vertically curved lines so it forms a very sharp edge facing downward (one is on his right fingers while the other one is on the left arm).
Draw a vertical line from the sides of the horizontal line of the jaw while minding the left arm.
Draw another slant vertical line towards the direction of the first one so it forms an edge.
Do the same for the right side of the body, the shape of the hair on the right side of the body is more prolonged and broader than that of the left side of the body.
Draw a slightly vertically curved line from the thigh of the left leg.
Double the line so it forms another edge pointing downward.
Draw a curve from the curved side of the chest to the thigh of the right leg.
Draw another curve from the wrist of the right hand to the direction of the first curve which is in the thigh.
Draw a curved line joining the middle line of the legs together.
Draw a small curved line beside the hair you drew at the left thigh so it looks like the continuation of the curved line.
Draw a vertical line joining the curved line to the hair of the thigh so it forms another edge.
Add more edges to the left and right sides of the thighs for the hair to look more real.
Draw Kite’s Pant & Shoe
Drawing the pant is easy since you’ve done with the Kite hxh legs drawing, the pant covers all his legs so let’s add more details so we can draw the pant.
Firstly, make a small line under the circle of the waist joining the middle lines of the legs together.
Add a curve at the upper part of the right thigh so it forms the correct shape of the pant covering the hip.
Make a vertical line inside the oval shape of the waist so it looks like the continuation of the vertical line you drew for the basic of the waist, this is the front of the upper part of the waist.
Add curves at the lower part of the pant so it shows the folded or rough part of the pant.
Draw a slight vertical curved line from the lower part of the pant to the upper part of the shoe.
Use a vertical line to form an edge at the lower part of the right pant.
Make a curved vertical line at the side of the lower part of the left pant.
Make another edge inside the lower part of the pants so it looks rough and shows the proper shape of the pant.
For the shoes, make a slant line at the lower part of the right pant to the oval shape of the feet.
Draw a curve under the oval shape of the right feet so it forms the sole of the right shoe.
Draw a slight bend at the side of the oval shape of her left foot.
Draw a horizontally curved line for the upper part of the shoe, draw a curve on the first curve of the right sole, and make a flat curve from the front of the right feet to the sole.
Hence, it forms the proper shape of the shoe sole, adds a curve at the front part of the left foot, and makes a broken curve on the oval shape of the left leg.
Hence, it forms the natural shape of the shoe facing downward and adds a slightly curved line to the oval shape of the right feet.
With these approaches, you can quickly draw the shoes facing the right direction.
Enhance Outfit
Use thick lines for the border of the outfits.
Add lines to the knee joints to make the pant look more practical.
Add three horizontal lines joining the vertical lines of the waist together so it forms the pattern on the upper part of the pant.
Erase all the excess lines and dots so you can focus on the main lines.
Use thick lines for the border of the cap,
You can also add shadow or highlighting to your outfit if that will make it look good.
Use the proper color to beautify the outfits, the cap is blue, the upper part of the pant is sky blue, the pant itself is black, the top is white, and the shoe is army green.
Enhance Outline
Draw a vertical line and make the end sharp edge by adding another small line, so it forms the shape of the nose and uses a thick line for it,
Uses a thick line for the mouth.
Use a thick line for the border of the hair.
Trace the convex curve of the eyes with a thick pencil and use the appropriate color for the eyes.
Kite drawing is fair in complexion so put that in mind while coloring what you’re drawing.
Conclusion to Kite hxh Drawing
With these few steps am sure you can quickly sketch your Kite drawing with ease; though seeing the Kite drawing might look hard to draw, with time and patience, you will become a master of it, find a convenient place for yourself and have fun with your pencil.


")
")
")
")