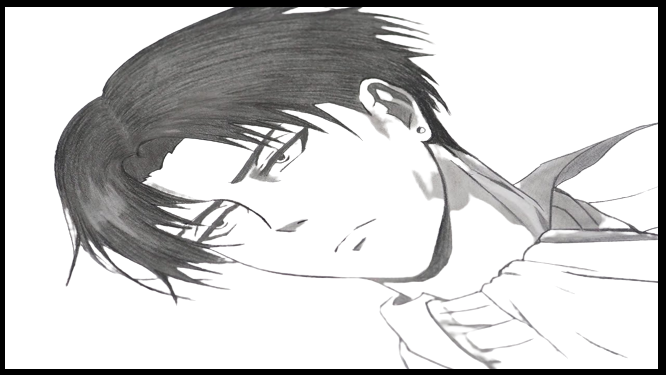
When it comes to drawing, no one starts with a difficult drawing and then learns how to make it easier by using steps. Here is an easy step-by-step guide on how to draw Levi Ackerman.
How to Draw Levi Ackerman
Contents
Everyone loves the anime and manga series Attack on Titan, but no one knows how to draw the main character, Levi Ackerman.
Sure, you can copy other people’s drawings of him, but if you want to capture his true essence and power, you need to learn to draw him yourself!
This step-by-step guide will walk you through all the necessary steps to draw Levi from scratch successfully.
Now all you have to do is follow along!
OR
If you’re looking to dive into the art of drawing or just want to hone your skills, one of the best anime and manga characters to try your hand at drawing is Levi Ackerman from Attack on Titan.
Though he got complex character design and numerous scars and battle wounds, Levi Ackerman’s face and body are simple enough that they’re perfect for beginners to practice sketching while also creating a realistic final product.
Drawing Levi in 12 Different Anime Styles (Video Tutorial)
Using our step-by-step guide, you’ll be able to sketch out Levi Ackerman in no time!
Material Required for Levi Ackerman Drawing
You will need a few materials to draw Levi Ackerman from Attack on Titan.
First, you’ll need a good sketchbook and some drawing pencils.
You will need a light blue pencil, an orange pencil, and a dark brown or black pencil for the character itself.
You will also need a ruler, an eraser, and some patience!
OR
A pencil, a graphite stick, a ruler (1/2), and a colored pencil.
Drawing books like Drawing Manga Faces by Sarah Watson are also useful if you have them.
Any other art supplies you have will be useful as well.
The key here is that there is no one right way to draw and that if you don’t have access to something (pencils, paper), then it’s not going to hold you back; just find something else and use it! 🙂
Steps Involved In Levi Ackerman Drawing
This tutorial will learn how to draw Levi Ackerman from Attack on Titan.
We will use basic geometric shapes and easy-to-draw lines to create Levi’s form and facial features.
We will be using a few reference photos of Levi Ackerman for this tutorial.
Let’s get started!
OR
This is a step-by-step guide on drawing one of the main characters from the anime/manga Attack on Titan (Shingeki no Kyojin), properly named Levi Ackerman.
Step 1) Make a shape of acorn-like so and sketch in the facial guidelines
The face is one of the most difficult features to get right in an illustration.
It’s also where your eyes start looking, so you want it to be as accurate as possible.
Start by making a basic outline of the acorn-like shape, then sketch in what will eventually become eye guidelines and facial lines.
As you can see, there isn’t much detail here; that comes later.
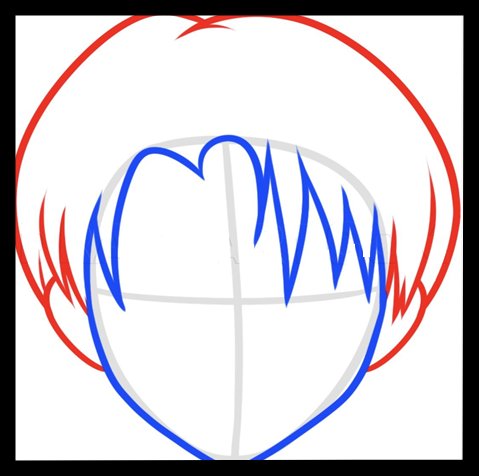
Step 2) Draw in the shape of Levi’s face and add some uneven parted bangs
Notice that Levi has some hair sticking out of his helmet.
He adopted this style when Eren told him it made him look cool.
If you have trouble drawing hair, try using a larger pen and getting a thicker line by pressing harder with your pen.
Always remember that learning how to draw doesn’t have to be complicated!
So have fun with it!
Step 3) Finish the shape of Levi Ackerman’s basic facial features
The third step for drawing Levi Ackerman is making his large, sharp-tipped spikes.
Start by lightly drawing a pair of intersecting lines that go down from both sides of his head.
Make these hairline guidelines as wide as you want them to be, but keep in mind that if they are too thick or large, it will make it harder for you later when trying to make these elements less blocky and more tapered at their ends.
Once you have drawn a couple of Levi’s hairlines, follow through with drawing and creating actual box-shaped spikes (or quills) atop each line.
His hairstyle should be four or five steps; otherwise, they may look too flat.
In the next step, you have to draw all of Levi’s basic facial features.
Start by drawing a large jawline.
His jawline is slightly more square than round, but you can use either shape depending on your artistic tastes.
After that, add two circles for his ears and three parallel lines to help give his cheeks some depth.
Again, feel free to change these lines if you want a different look; it’s totally up to your preference!
You can also make his jaw square or narrow it down for a more feminine shape!
Just remember: A character is whatever you want them to be!
Step 4) Draw the squinted shape of Levi Ackerman’s eyes and color the eyebrows
Start with a circle.
Then draw two intersecting lines horizontally and vertically (each line should be about 1/4 of your circle).
You can decide how thick you want these eyebrows.
After that, use basic shapes to sketch out Levi’s squinted eyes.
Don’t worry about getting too detailed or perfect because they will be covered up later.
After drawing his eyes, color them with a dark gray outline smaller than your previously drawn circle (this will create more detail in his eye); after coloring his eyes, color in the surrounding area around his eyes so that there is no white showing.
Step 5) Draw the nose, a pupil of Levi Ackerman’s, and color in his pupil
The next step in drawing Levi is to draw his nose.
It should be big, as all noses are.
A small nose would look weird (unless it’s a little person).
There isn’t a lot of detail necessary for drawing his nose, so you don’t need to stress over it at all.
The next thing you want to do is draw his pupil.
A simple black dot will suffice if your picture doesn’t have any flash effects or lighting issues.
Next, you’ll want to color in that black dot with some grey shading and some shadows around it.
This will make it appear three-dimensional and real rather than flat and dull like a piece of paper or cardstock.
Step 6) Erase Extra Guidelines
Try erasing any mistakes or extra outlines when you’ve already drawn out your drawing of Levi Ackerman.
Erasing is a quick and easy way to fix lines that are not in place or have stray marks.
This is why one needs to draw lightly, so their work will still be visible when they go back over their drawing with a pen/pencil of darker color.
If you tend to press hard on your pencils, use a thinner pencil and make sure you’re sitting comfortably at a table so that you don’t experience hand cramps if you decide to draw for hours!
Step 7) Finishing Touches to Levi Ackerman’s drawing
Now that you have all of your facial features in place, it’s time to start working with them.
You might need to go back into some areas and make a few more lines or add another shape.
Remember that everything you draw is part of a bigger picture.
When you get bogged down by too many little details, stop and look at what you’ve got so far.
Think about how these individual pieces fit together and help tell your story visually.
Once you’re sure you have Levi Ackerman’s face looking just right, it’s time to move on coloring
You can add some color to finish it all off
When adding color to your drawings, make sure you have a good quality pencil and paper.
Also, you can use markers, watercolors, or even crayons.
You can use colored pencils because they’re easy to use and beginner-friendly.
If you want your colors to appear shiny, add a clear coat of varnish over the top!
Use an eraser if you made any mistakes while coloring in Levi Ackerman’s drawing.
Just remember that it is a delicate process since there are very fine details in some parts of his body, like his nose or eyebrows.
It may take a few tries before getting used to it, but you will get better with practice!
Drawing LEVI in 20 Sec | 3 Min | 30 Min (Drawing Challenge)
Conclusion
This was a really fun blog post to write!
If you want to learn how to draw Levi Ackerman from Attack on Titan, just follow these simple steps.
He’s a pretty easy character to draw, and we are sure you’ll have a lot of fun making your own Ackerman fan art.
Make sure to leave a comment and let us know how your drawing turns out. We can’t wait to see it!
OR
Do you want to learn how to draw Levi Ackerman from Attack on Titan?
Check out our latest tutorial, which will show you all you need to know.
We’d love to see your finished results, so please post them in the comments below.


")
")

 Breif & Easy Guide")
")
")
")