This lesson demonstrates how to draw anime hats and headwear. There are twelve examples in all, each with step-by-step sketching directions.
This lesson includes the following styles of hats and headgear:
1. Baseball Cap
2. Cat Ears Hat
3. Sun Hat
4. Santa Hat
5. Winter Hat (with PomPom)
6. Fedora Hat
7. Wizard Hat
8. Hoodie
9. Beret
10. Cowboy Hat
11. Explorer Hat
12. Newsboy Cap
If you’re going to design any of the hats in this lesson using a pencil and paper, make sure to keep your lines light until you’re almost done. You’ll need to erase various picture elements when going between the phases. The lines in the sample have been darkened solely to make them more visible.
Drawing Hair With a Hat On
Before you start designing hats, keep in mind that your hair will generally be compressed when you wear a hat. This implies that you should give it a little less volume if you’re sketching hair with a hat on. However, remember that anime hair is typically drawn puffier than natural hair, so you can still draw it a significant distance away from the head, even when compressed.
Please note that while the focus of this tutorial is on creating caps, the hair will not be covered in detail.
Step-by-Step Instructions for Drawing an Anime Baseball Cap
Begin by sketching a head contour and the expected amount of hair behind the cap, as illustrated above. Then, draw it on top of them to ensure that the baseball cap is placed correctly on the head.
Draw the top of the cap in a form similar to the outline of the hair but somewhat farther away on top than on the sides. Next, draw a bill that curves up around the top of the skull.
Remove the head and hair outline sections that the hat should obscure after drawing the primary shape.
After that, add the hat’s tiny embellishments. Because anime hats are frequently more basic than genuine caps, you only need to add small details. First, draw a line outlining the bill’s shape to represent most baseball hats stitching around that area. Next, add a few lines from the bill’s edges along the sides of the hat to illustrate the splits in the many panels that most baseball caps are made up of.
Above is a bigger drawing of the completed hat and some basic hair shading.
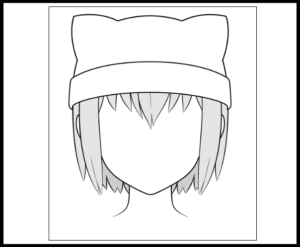
Step-by-Step Instructions for Drawing an Anime Cat Ear Hat
In anime and manga, the cat ear hat is particularly popular. It’s also really simple to draw.
Begin by sketching the head and hair.
With just a few curved lines, draw the top half of the hat with the cat ears extending out to the sides, as seen in the image above.
After you’ve drawn the hat, erase the areas of the head and hair that should be hidden.
Add the remainder of the hair poking from beneath the cap to complete the design.
A bigger version of the cat ear cap illustration with basic hair shading is shown above.
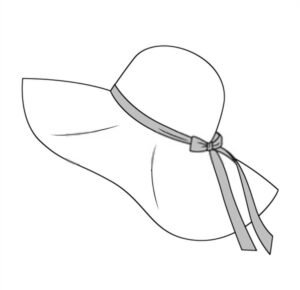
Step-by-Step Instructions for Drawing an Anime Sun Hat
The sun hat is a popular accessory among female anime characters during the summer.
To begin, sketch the head/hair outline.
Draw the top of the hat a little more away from the hair on the sides and a little further away from the hair at the top.
Draw a twist in the hat’s brim and then add a curve on top of it, as seen in the image above.
Add the hair to complete the drawing.
The fully sketched hat with some basic shading can be seen above. Only the underside of the brim is tinted in this example (excluding the hair), as that area is generally in shadow.
Step-by-Step Instructions for Drawing an Anime Santa Hat
In anime and manga depicting winter holiday celebrations, the Santa cap is worn by both male and female characters.
To begin, create the head and hair outline.
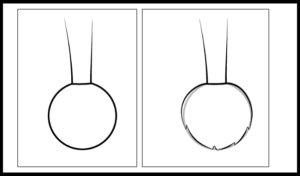
With the pompom, draw the bottom half of the hat on a little angle tilting to the side.
Draw the line that wraps around the head to the pom before adding the top section of the cap. Next, draw a line that outlines the opposite side of the hat, curving up but ending just short of the hat’s top. Finally, draw a curving line from the pompom to the region surrounding the ear. Draw the pom in the shape of a circle, except for a slightly curved depression at the top where it links to the cap.
Once finished, erase the sections of the head/hair covered by the hat.
Drawing of an anime Santa hat with pompoms
As illustrated, add some fluff to the pom circle and remove any extra lines.
Add the hair to complete the drawing.
A huge sketch of the full hat with light shading can be seen above.
See here for instructions on how to draw a figure wearing this hat:
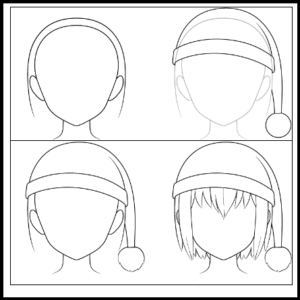
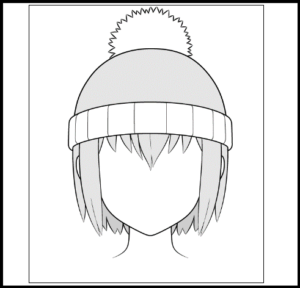
Step-by-Step Instructions for Drawing an Anime Winter Hat
The winter hat with the pompom is identical to the last model. This is another thing female anime characters frequently wear in the cold.
Draw the head with the hairline as a guide.
Add a single huge curve to the top of the hat that is further away from The head is on top, and the sides are closer to it. The bottom section of the hat should now wrap around the hair/head. Finally, attach the pompom in the shape of a circle, partially concealed under the hat.
After that, delete the sections of the head and hair that the hat obscured.
Drawing of an anime winter hat with pompoms
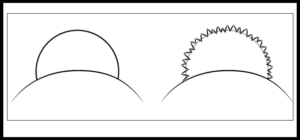
Draw the fluff in little pointed clumps of somewhat varied sizes around the pom’s circle, similar to the image above. Once you’ve finished, erase the circular line.
As a little design feature, you may draw some lines down the bottom of the hat (see a step-by-step example of one below) to make it appear a little more interesting. Draw the lines closer together as they travel away from the center of the head and further apart as they move away from the sides. This will assist in demonstrating how the hat wraps around the head.
You may complete the design by adding hair details.
The final sketch of the winter pom hat with basic shading can be seen above.
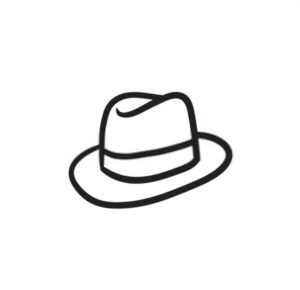
Step-by-Step Instructions for Drawing an Anime Fedora Hat
Masculine characters, particularly criminals, typically wear this hat. Female characters can occasionally wear it as well. However, this is normally part of a costume.
Sketching a rough outline of the head and hair. Next, draw the top of the head broader as it descends, with the sides slightly curled. After that, put a medium-sized brim around it.
Once you’ve finished creating the hat’s primary form, erase the sections of the head/hair that it covers.
Finish the sketch by drawing a stripe between the brim and the top of the hat, which is a common design feature on fedoras. You may also add certain hair details.
A bigger shaded illustration of the fedora hat may be found above.
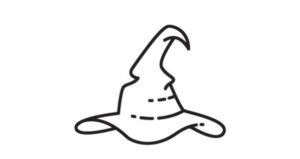
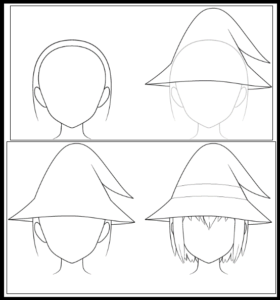
Step-by-Step Instructions for Drawing an Anime Wizard Hat
The wizard hat is frequently seen in fantasy anime, and female characters wear it.
Begin by sketching a head and hair outline, then put the hat on top.
The entire hat should be in the shape of an upside-down ice cream cone, with the top portion dangling to one side.
To show that the hat is inclined slightly upwards, draw a pair of lines from the hat’s bottom left and right points to the ears. These lines define the inner/background section of them at will.
After you’ve finished designing the hat’s exterior form, erase the sections of the head and hair that it covers.
Add a little band around the place where the wizard hat transitions from the brim to the top to complete the picture. You may also sketch the hair’s details.
A larger final design of the wizard hat with some basic shading can be seen above.
You’ll note that the background/inner area of the hat (at the very bottom) is tinted significantly darker than the rest since it receives less light.
Step-by-Step Instructions for Drawing an Anime Hoodie
In anime and manga, the hoodie, in general, are highly frequent. A wide range of personalities can wear them for several reasons.
Begin by sketching a rough contour of the head, hair, and upper half of the shoulders. Because a hood does not put considerable pressure on the head, you may pull the hair volume to the same level as when no headgear is worn.
Draw the hood in two parts: the cloth outline and the hole in the center for the face. The hood’s outer shape should first resemble (but be somewhat different from) the shape of the hair, then develop broader as it gets closer to the neck should curve back inwards towards the head around the neck region.
Draw the inner shape of the hood in the same way as the exterior shape, but starting from about the forehead and ending with a pointed downwards tip around the upper chest area (we will add a zipper here later).
Remove the hood from the head regions and the hair covered by it.
Add another line around the inner section of the hood that tracks its form nearly identically at first, then travels away from it over the shoulders and towards the bottom tip of the hood’s inner shape.
Fabric thickness illustration of an anime hoodie
Draw a second pattern around the place where the primary inner shape of the hood begins to depart from this line.
You may finish the drawing by including a zipper and hair embellishments (shown in the step-by-step example or the drawing below).
A huge sketch with some rudimentary shading can be seen above. Because the inner half of a hood is generally always in darkness, you should shade it darker than the rest of the hood.
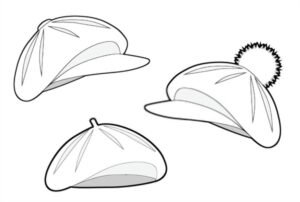
Step-by-Step Instructions for Drawing an Anime Beret
The beret is a fashion accessory or part of a uniform worn by anime characters.
Begin by sketching a head and hair outline. You may leave the hair volume uncompressed, just like the hood (same as when no hat is worn).
Draw the very top section of the beret wrapping around the top part of the head but a decent distance away (berets are known for being “puffy”). After that, add the little strip at the bottom, wrapping it around the skull approximately halfway. Next, draw a fold from the top section of the beret falling to one side of the head across one side of this strip. The example above shows that you can indicate the fold with just one angled, curved line.
Complete the drawing by adding the hair detail.
Above is a sketch of a beret with some basic hair shading added to make it stand out a little more.
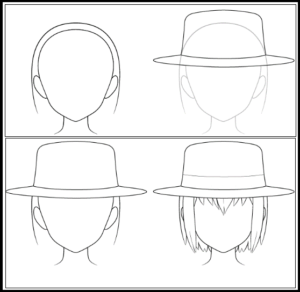
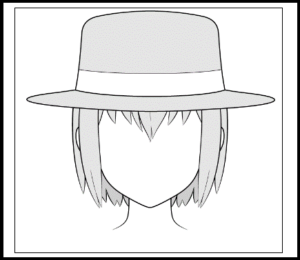
Step-by-Step Instructions for Drawing an Anime Cowboy Hat
Anime characters frequently wear the cowboy hat as part of their costumes, but some also wear it as their everyday attire.
sketch a rough outline of the head and hair.
Make a wide curve at the bottom of the top half of the hat. The hat will appear to be somewhat pulled down on the forehead (how cowboy hats are often worn). Also, the top of the skull should be broader at the bottom and narrower as it rises. At the very peak of the hat, where the hat curves slightly downwards, there should be a little depression.
Draw the brim of the cowboy hat in the shape of a sausage, with the ends curving upwards on either side.
Once you’ve finished creating the hat’s primary form, delete the sections of the head and hair that it covers.
Add a wave-like form immediately below the top of the hat for some basic details to emphasize that that area is gently bent downwards. You may also draw another line that follows the brim’s contour. This line might symbolize the common stitches on these caps in that location. Next, draw it away from the brim at the front and closer to it as it moves to the rear, eventually uniting the two lines.
Complete the drawing by adding the hair details.
You can see a cowboy hat with some basic hair shading in the image above.
Step-by-Step Instructions for Drawing an Anime Explorer Hat
Anime characters frequently wear the explorer hat on an adventure, usually in a jungle setting.
Step-by-step illustration of an anime explorer hat
Begin by sketching a head and hair outline.
Draw a half-circle form for the top of the explorer hat and a much lighter curve for the bottom. First, make the brim of the hat as short as possible. Next, draw a form that follows the bottom curve of the top half of the head a little distance away, then sticks out a little more to the sides.
You may add the split lines between the multiple panels that are so iconic of these explorer hats, as well as a button-like form on the very top for the final touches.
To show the panels, draw a pair of curved lines from each side of the hat to the top tip, then add the button where those lines meet at the very top.
Add some basic hair touches to finish the drawing.
A close-up of the explorer hat and some basic hair shading can be seen above.
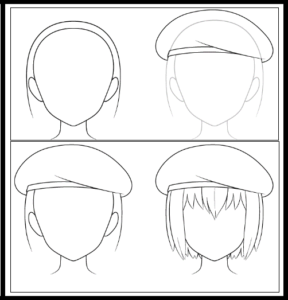
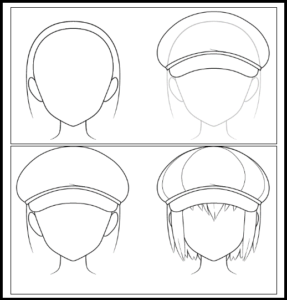
How to Draw an Anime Newsboy Cap Step by Step
Newsboy hats are a fashion version of the genuine item that female characters wear when they go out in anime.
Before designing the hat, sketch a basic contour of the head and hair.
Begin sketching the hat by drawing the very top piece of the hat. It should have a small curve around the head, with the sides a little further away than the top. A little fold has been added to the center of the hat to assist convey that it is made of a soft material.
After you’ve finished creating the hat’s primary shape, erase the sections of the head and hair that it covers.
The only additional elements for this example will be a few curved lines to illustrate the splits in the hat’s various sections. Draw these lines so that the front panel (facing the viewer) is the broadest and the subsequent panels narrow as they travel away from the spectator.
You may now add the hair details to complete the design.
A bigger design of the newsboy hat with some hair shading can be found above.
Conclusion
This tutorial goes through some of the most prevalent anime hats and headgear varieties, although there are many more. You may probably use the same principles as the examples in this lesson to create whichever sort of hat you choose. First, make a quick sketch of the head and guess how the hair will appear beneath the hat. After that, sketch the hat’s primary outline, then the minor details.


 Breif & Easy Guide")
")
")