Have you been looking for an easy way to draw Zeniba within a few minutes of your spare time? Well, now you can learn how to draw her with this easy step-by-step guide I will show you below.
Zenibais a very important character in Spirited Away. She is the twin sister of Yubabaand takes care of the bathhouse while her sister is away. Zeniba appears to be a witch, but, in reality, she is a character who cares for the bathhouse employees.
She is also seen as a mentor figure who teaches Chihiro her true value.
The fact that she has a twin sister and helps people was important for Spirited Away to get away from clichés about witches being evil and constantly serving the main villain in fairy tales.
Well, now you can learn how to draw her with this easy step-by-step guide I will show you below. So let’s get started with the Zeniba drawing
Outline the Head of Zeniba
Contents
We will begin our drawing by sketching out the basic shapes of the body.
The first approach towards that is by outlining Zeniba’s head; her head is so important with so many details because it is so full of amazing features.
Zeniba wears a hat, earrings, and glasses.
To draw Zeniba’s head, make a large oval shape that seems flat for the shape of the head, and add a perfect vertical line at the center of the head, which will be used for the alignment of the facial features.
Make a horizontal line for the primary approach to the eyes so that it crosses the vertical line of the head.
For the basis of the nose, make another horizontal line under the eyes, but this time not as wide as that of the eyes so that it crosses the vertical line of the head.
For the mouth, make a curved line in the form of a convex, flat curve under the nose line so that it also crosses the vertical line of the head in alignment with the natural arrangement of the facial features.
Outline Zeniba’s Body
Next, you need to outline her body; Zeniba is an older woman, which automatically means her body structure cannot be like the young anime character; her body seems to shrink together due to her old age.
For her chest, make a slant line at the sides of the oval shape of the head while the left slant line touches the head, and the right slant line seems closer to the oval shape of the head, join these slant lines together with a horizontal line so that it forms slightly sharp edges at the sides of the body.
For the lower part of her body; make a slant line just like you did the last time, but this time, the lines are longer than the previous one because it shows the length of the body; join these slant lines together with a horizontal line which forms blunt edges pointing at the sides of the body and that’s all you need to before you begin to add the features of her body.
How to Draw Zeniba Arms
Have you ever tried drawing an older woman’s arms before?
If not, let me show you how to replicate that using the easiest approach. You know
For these arms, you can use the same approaches you used for the right arm and the left arm too, and vice versa because Zeniba’s arms are in the same position resting on the lower part (waist) of the body.
Now use lines to draw the arms so that it’s connected to the oval shape and resting on the lower part of the body.
Draw the hand’s basic shape attached to the arm’s end, so it’s also resting on the lower body’s part.
Now that you are done with the arms; let’s make the shrinky jaw of her head, make the corresponding letter “u” line in the form of a wavy line around the lower part of the oval shape of the head so that it forms the natural shape of the jaw in alignment to the head.
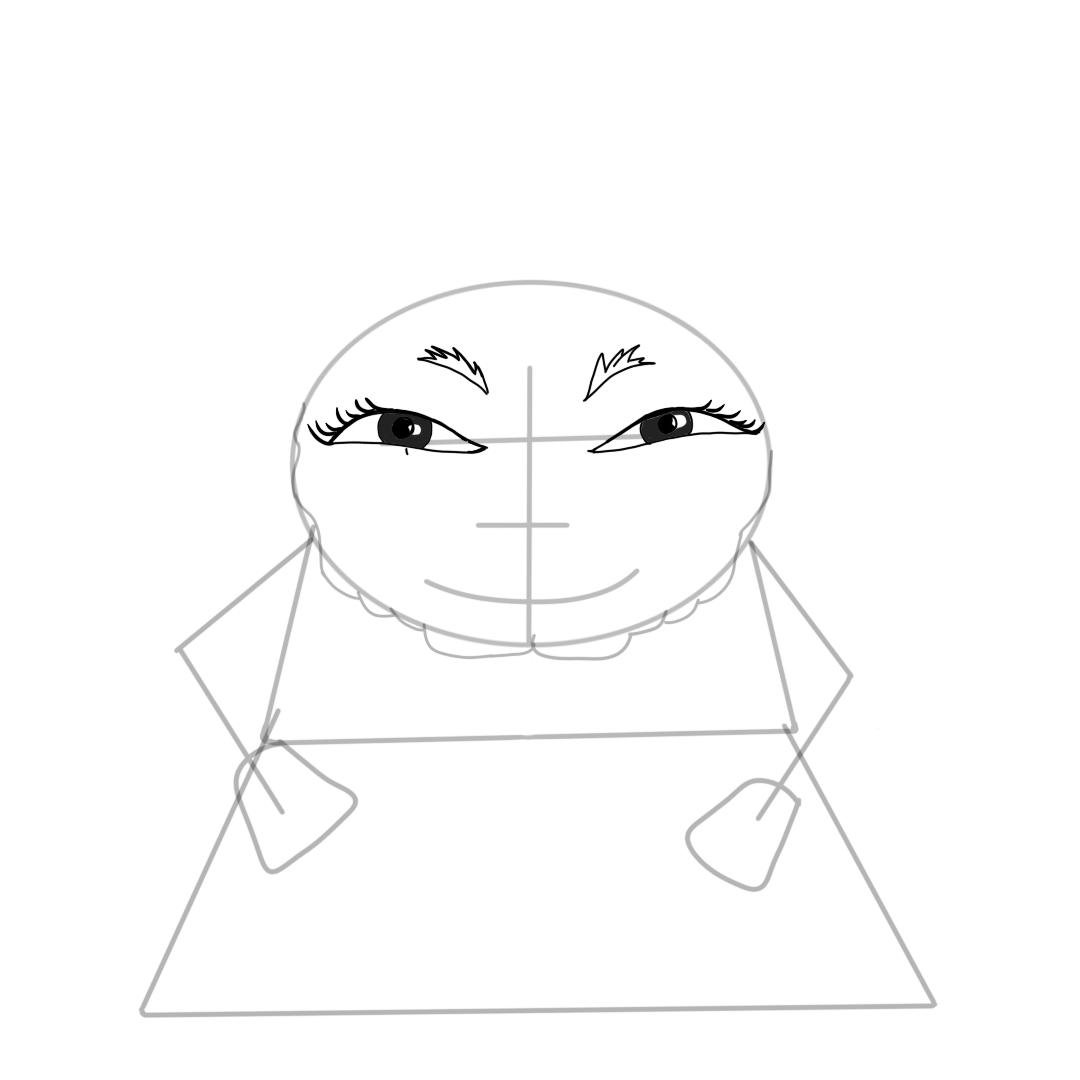
Draw Zeniba’s Eyes and Eyebrows
Want to know the best part? Her eyes are mysteriously shaped, which I am sure you cannot wait to recreate, and her eyebrow is so special that only Zeniba has that type of eyebrow among the anime character.
This time, we’ll draw the eye first and fix the eyebrow later.
For the eyes; draw a flat, concave curve above the horizontal line you drew for the basis of the eyes, and add a horizontal line to the bottom of the concave curve so that it’s aligned with the basis of the eyes.
The most interesting part is this, draw a wavy line above the flat-concave curve of the eyes so it serves as the eyelashes and makes a broken curved line under the shape of the eyes so it serves as the lower eyelid.
Continue the eyes by drawing a concave curve around the wavy pattern of the eyelashes; this is Zeniba’s upper eyelid.
For the pupils of the eyes, make vertically curved lines inside the shape of the eyes, and you can add connected two small circles inside the curved lines, making the pupil of the eyes more realistic.
For Zeniba’s eyebrows, draw a curved line at the upper part of the eyes, which is closer to the vertical line of the head (center of the head), and add a zigzag line above the curved line, so it forms the eyebrow that looks leafy in shape.
Draw a circle between the eyes, which is closer to the glabella that the vertical line of the head is at the center of the circle, and this circle is also resting on the basic line you drew for the eyes.
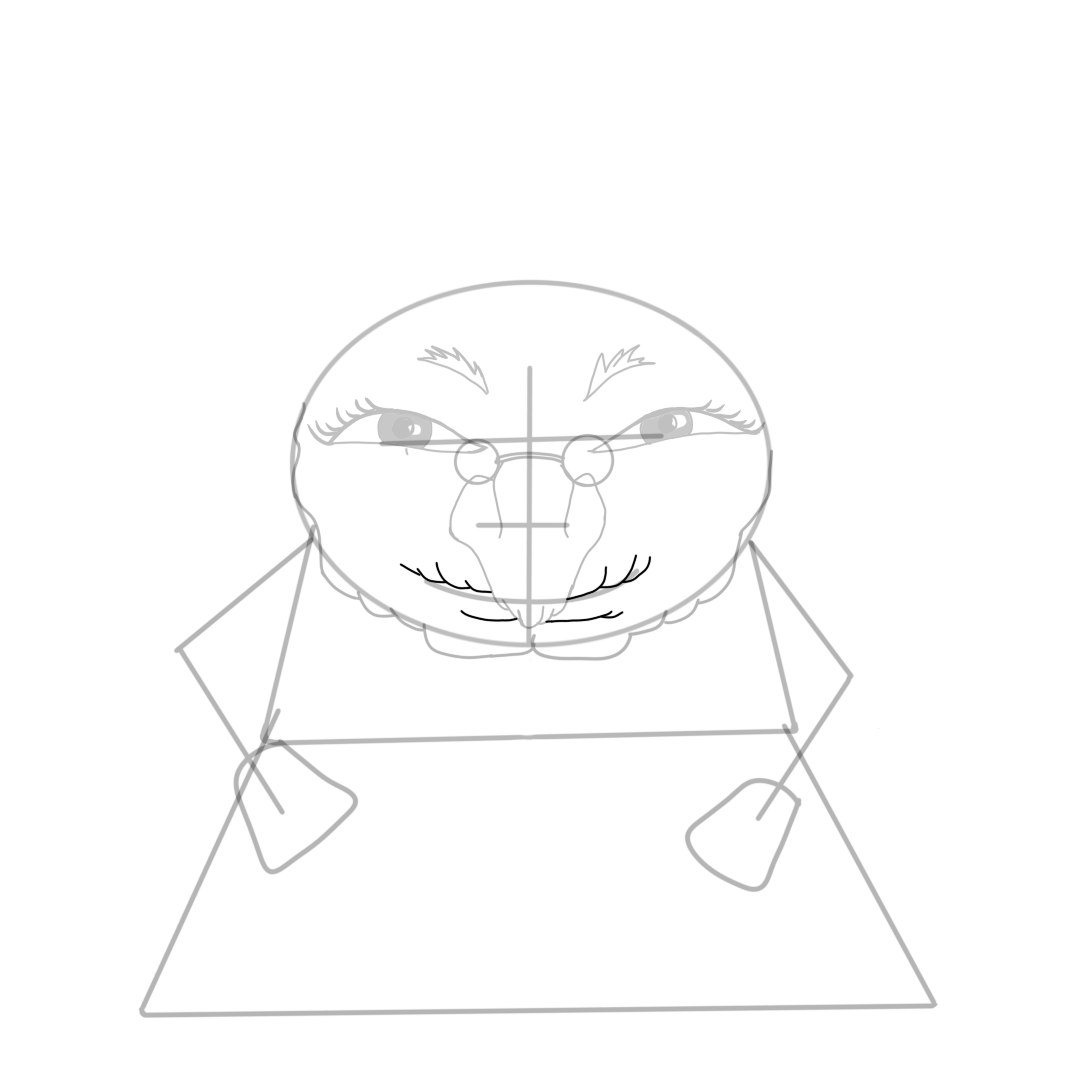
How to Draw Zeniba Nose
Make a slightly vertically curved line beside the vertical lines of the head so that it is between the basic lines of the eyes and nose, and draw a curved line at the side of these lines so that it’s manipulated to the shape of a nose, draw a “U” shape under the nose to form the nostril.
Add vertical lines inside the nose to make it more real.
Are you still with me?
Let’s try adding glasses to the face. Zeniba’s glasses rest on the nose just like other glasses will do on people’s faces but for Zeniba, let us make the glasses more unique and cartoonish by adding circles beside the curved lines of the nose, which touch the lower part of the eyes and join these circles of the glasses with a curved line at the top of the vertically curved lines of the nose.
How to Draw Zeniba Mouth
Let me show you how to stylishly make the incredible mouth she possesses with just a few curves and lines.
Firstly, make a convex curve at the sides of the nose and add curves vertically under the convex curve; this shows her cheekbones at the top of the mouth.
Draw a connected curved line horizontally at the lower side of the nose, so it’s aligned with the curved line you drew for the basis of the nose.
Finish up the mouth by making another curved line at the sides of the nostril so that it adds expression to Zeniba’s face.
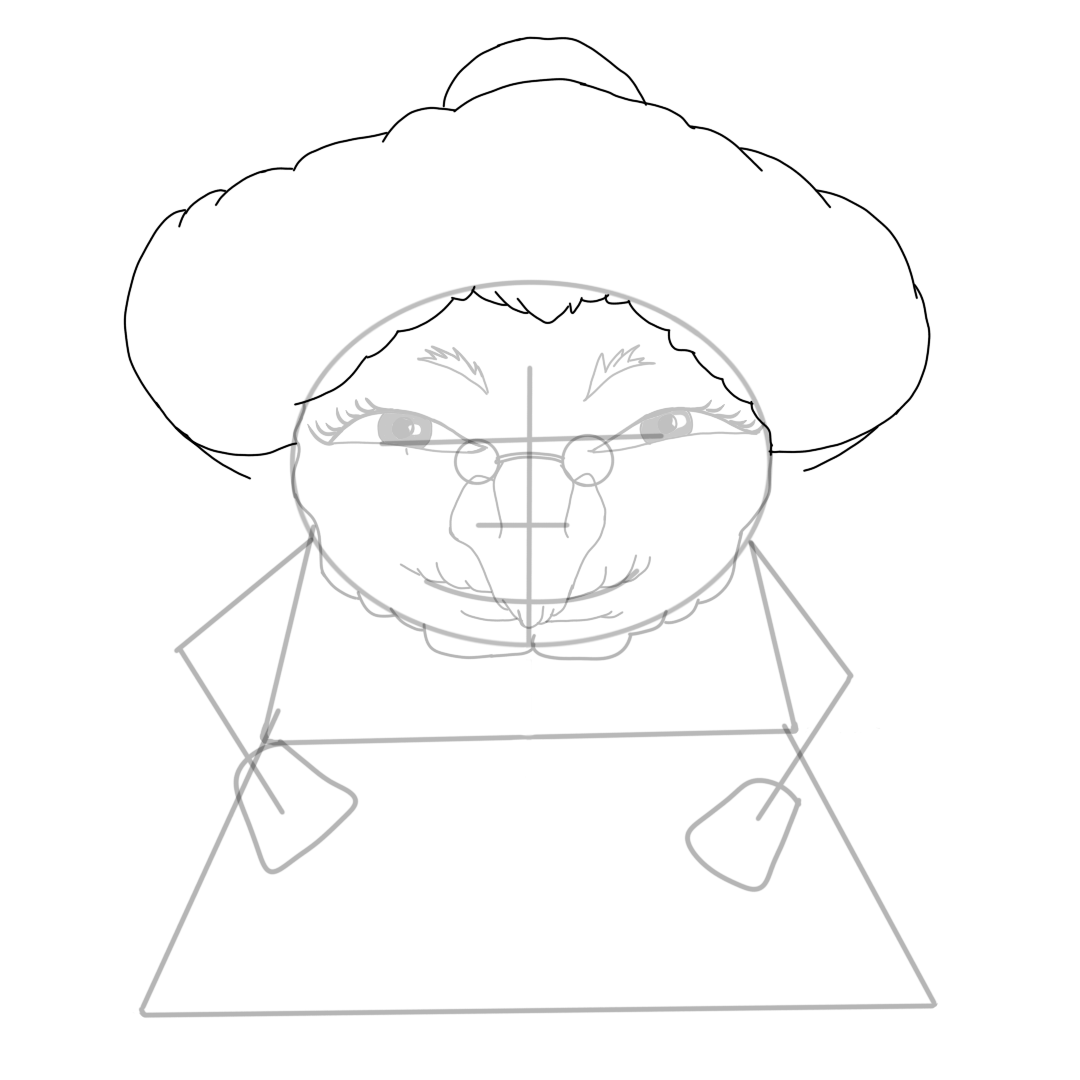
How to Draw Zeniba Hat
Now make a wide concave curve above the oval shape of the head so that the ends are at the sides of the head and add another little concave curve above the wide one forming the top of the hat.
Draw a wavy line around the top of the head so that it is aligned with the shape of the head; use this wavy line that looks like the letter “m” to join the ends of the jaw you drew so it also shows the lower part of the hat.
Continue the hat by tracing the wide concave curve with a wavy line so that it forms the actual shape of the top of the hat. Systematically add curved lines to the shape of the hat, making it more detailed.
How to Draw Zeniba Ears and Earrings
Zeniba’s ears are covered with the hat she uses to protect her hair; this hat covers the whole head while just little parts of the ears are obvious.
Make a double curved line at the sides of the head so that it’s connected under the hat. Now draw the earring by making a curved line at the sides of the head, which is attached to the doubled curved line of the ear.
How to Draw Zeniba Outfit
You are almost there!!
Now that you are done with the head’s major features, let’s get down to the outfit.
Draw the sleeves first before adding the body so you can have a smooth drawing, and since the arms are in the same position, you can use the same method to draw the right and left sleeves.
Draw a rough curved line for the sleeve so that it is aligned to the direction of the arms while it points towards the basic shape of the hands.
Draw the design on the top of the cloth under the jaw.
Draw a curved line in the form of the letter “w” at the chest part of the body so that the ends of the curved line are attached to the circle of the earrings, and add a horizontally curved line at the top of the chest shape of her body, so it makes it less cartoonish.
Add a slant line at the sides of the “w” that made up the chest so that it completes the sleeves, and that’s all for the upper part of the outfit.
For the lower part of the outfit, make a vertically curved line in the direction of the basis of the outfit and join the end of these curved lines with a wavy line in the form of a horizontal line, so it forms the bottom of the outfit.
Add a wavy line to the first one, so it makes up the bottom (helm) of the outfit.
Add Details to the Zeniba Drawing
Now that you are practically done with your drawing, add details to the drawing by adding lines and dots to the outlines and the outfit. Add curved lines at the forehead under the hat to show her wrinkled skin.
Add random lines to the lower part of the outfit to make it realistic, and add curved lines to the top of the hat.
Ensure you trace out all the borders of the outfit and outlines and erase all excess lines and dots that might not be needed in the drawing so your drawing won’t be too rough.
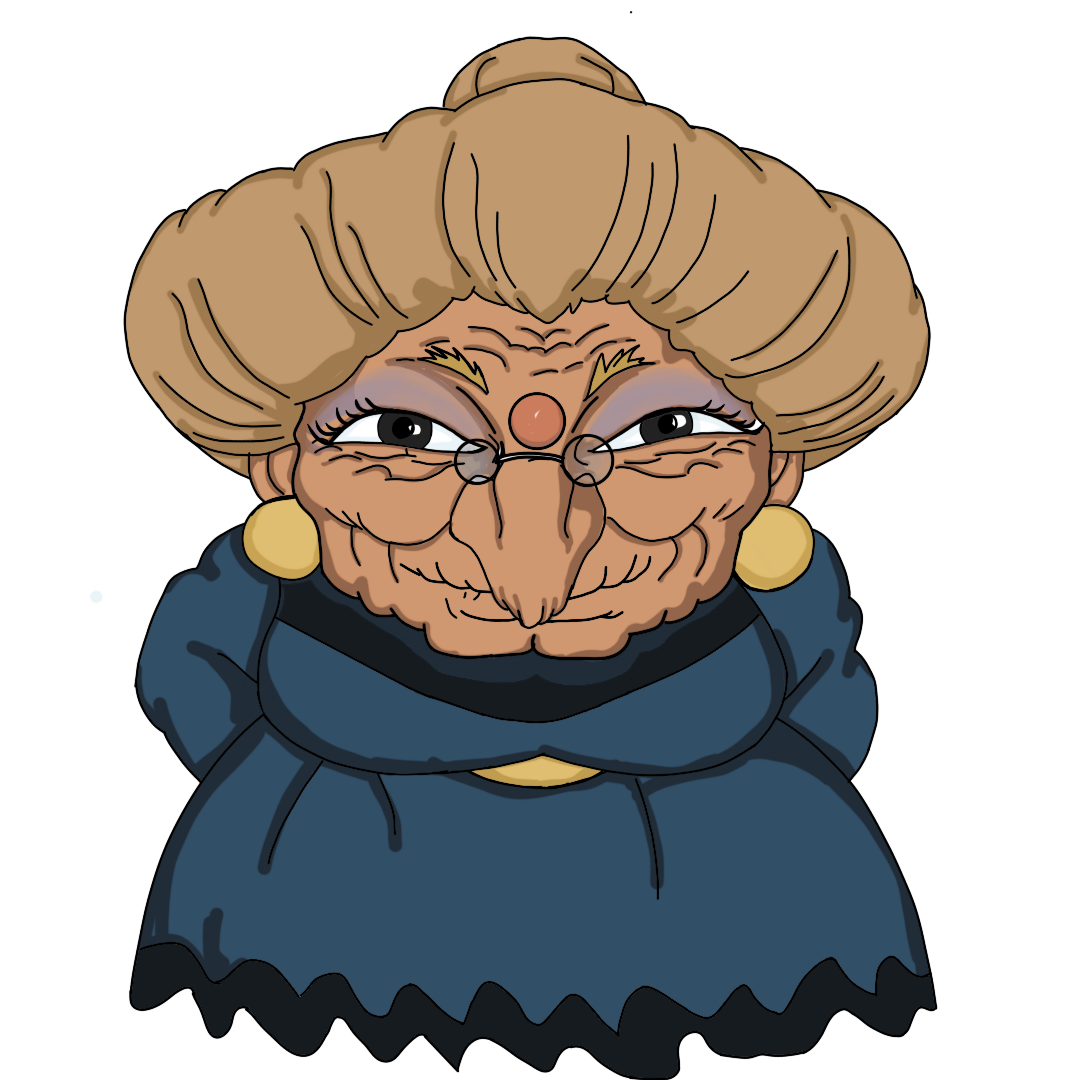
Add Colors to the Zeniba Drawing
Imagine what it would be like if you added some nice touches to the drawing by using eye-catching colors. At this stage, you just have to do it how you like and to your taste; add shadings to the pupils of the eyes.
Ensure you do not overdo this. Colors make drawings more attractive, while shadows and highlighting give the drawing a real moment. Add shadows and highlights to the important part of the drawing, especially the hat and the wrinkled face.
Conclusion
You have made it all the way, you have learned a new way to draw an older woman, and with your hard work, you can create an alluring drawing of Zeniba, which may not be too perfect but still looks like the character.
Try practicing more and more on this character to learn how to draw another anime character and improve your drawing skill. Have fun!


")
")
")
")
 From Spirited Away | Let's draw Haku")

 Breif & Easy Guide")