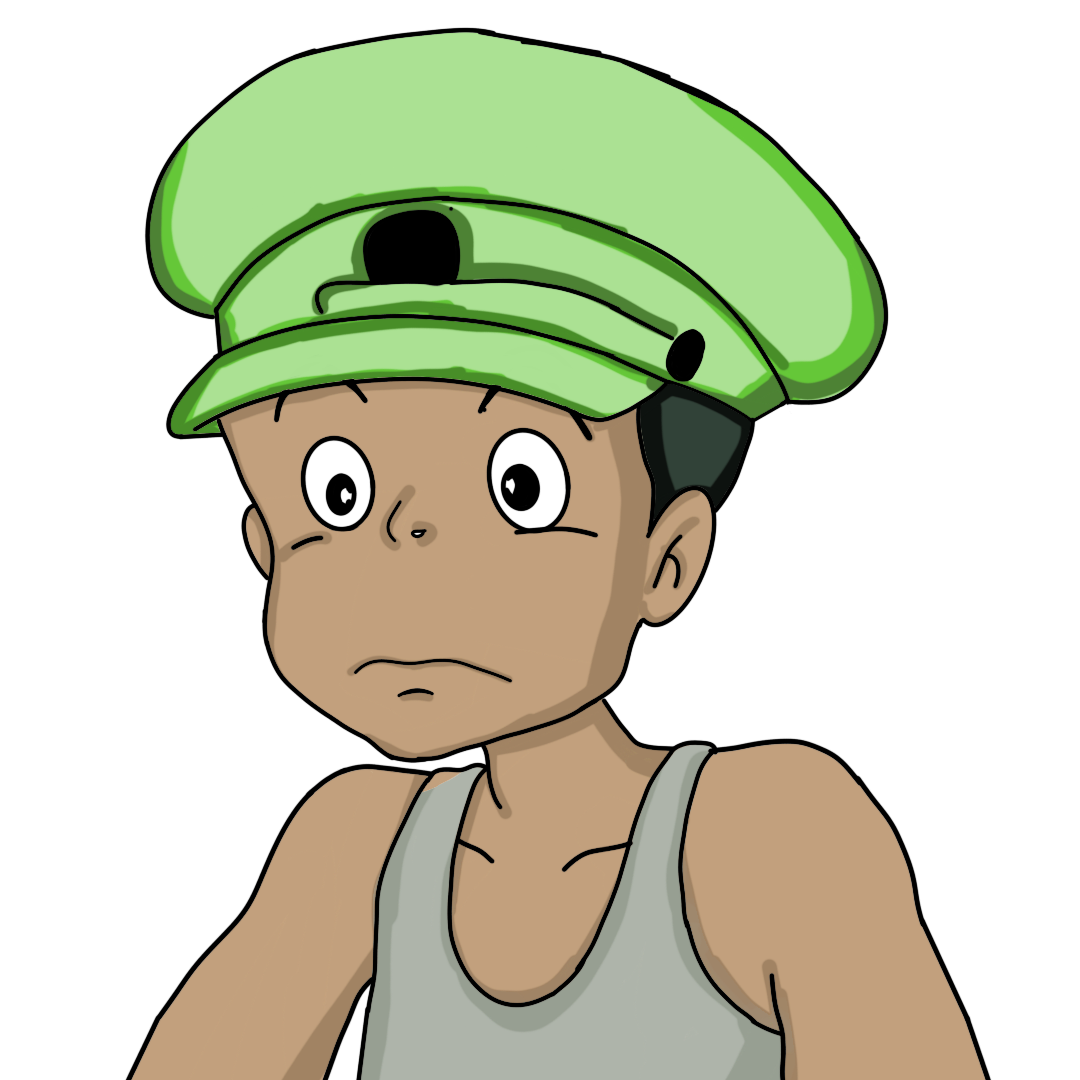
Let’s get started with the query “how to draw Kanta Ogaki”.
KantaOgaki is a character in the anime My Neighbor Totoro. If what you want is to draw Kanta Okagi, you’ve got the right article.
Just grab your pencil and your paper, and let’s get started.
Kanta Okagi wears a face cap that looks like a cop. You can draw Kanta Okagi from My Neighbor Totoro with just a few simple steps because we have provided you with step-by-step instructions.
Let’s go!
Draw the Head of Kanta Ogaki
Contents
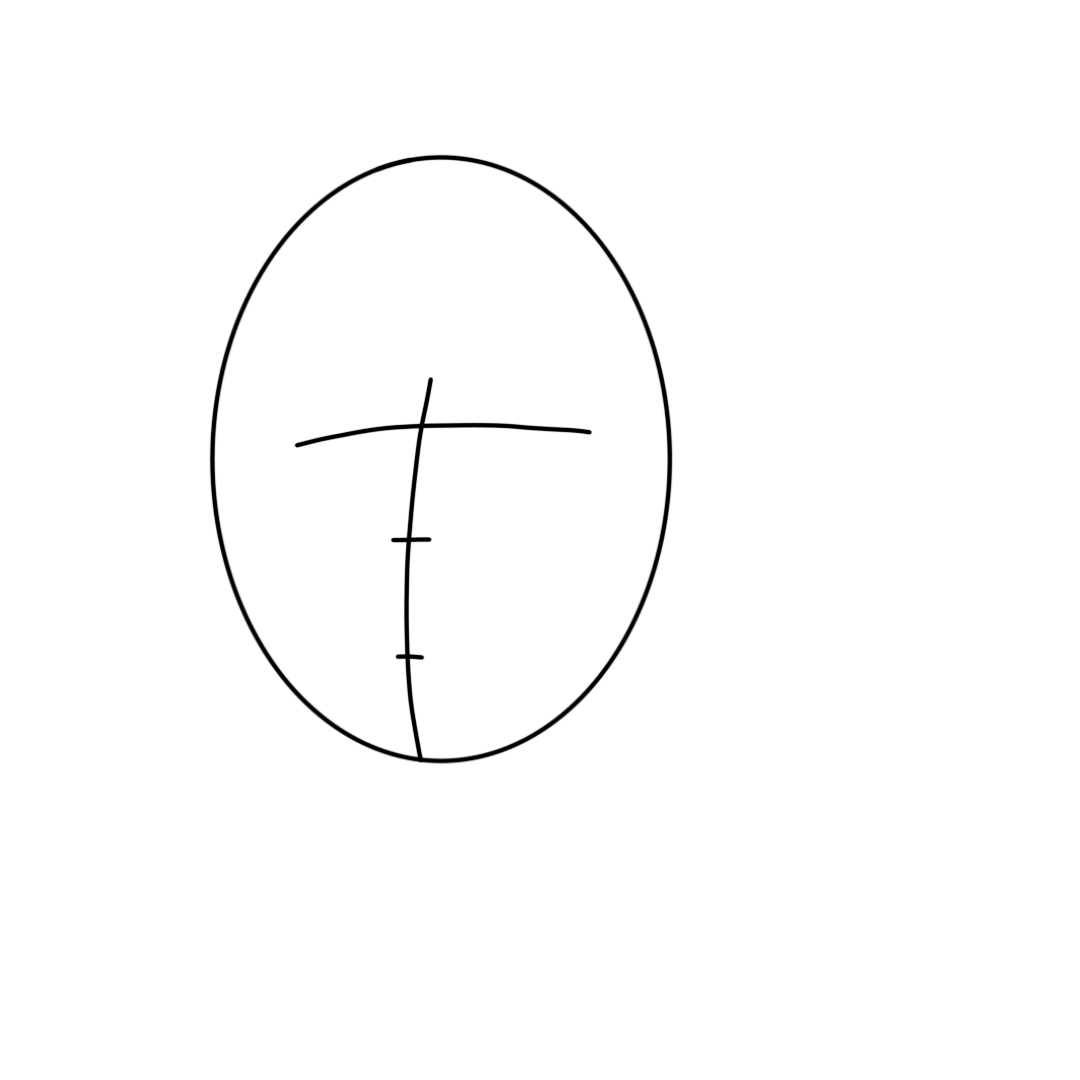
Let’s jump right in by drawing the head first; Kanta has a very big head, draw an oval shape for the head so that it looks like that of the egg’s shape.
Now add a vertically curved line at the center of the head so it will serve as an alignment for the facial features, add a horizontally curved line crossing the vertically curved line of the head; this horizontally curved line is the primary step that will help to align the shape of the eyes.
Make a little horizontal line under the horizontally curved line of the eyes so that it’s crossing the lower part of the vertically curved line of the head; this is the basic line for the mouth.
Outline the Body of Kanta Ogaki
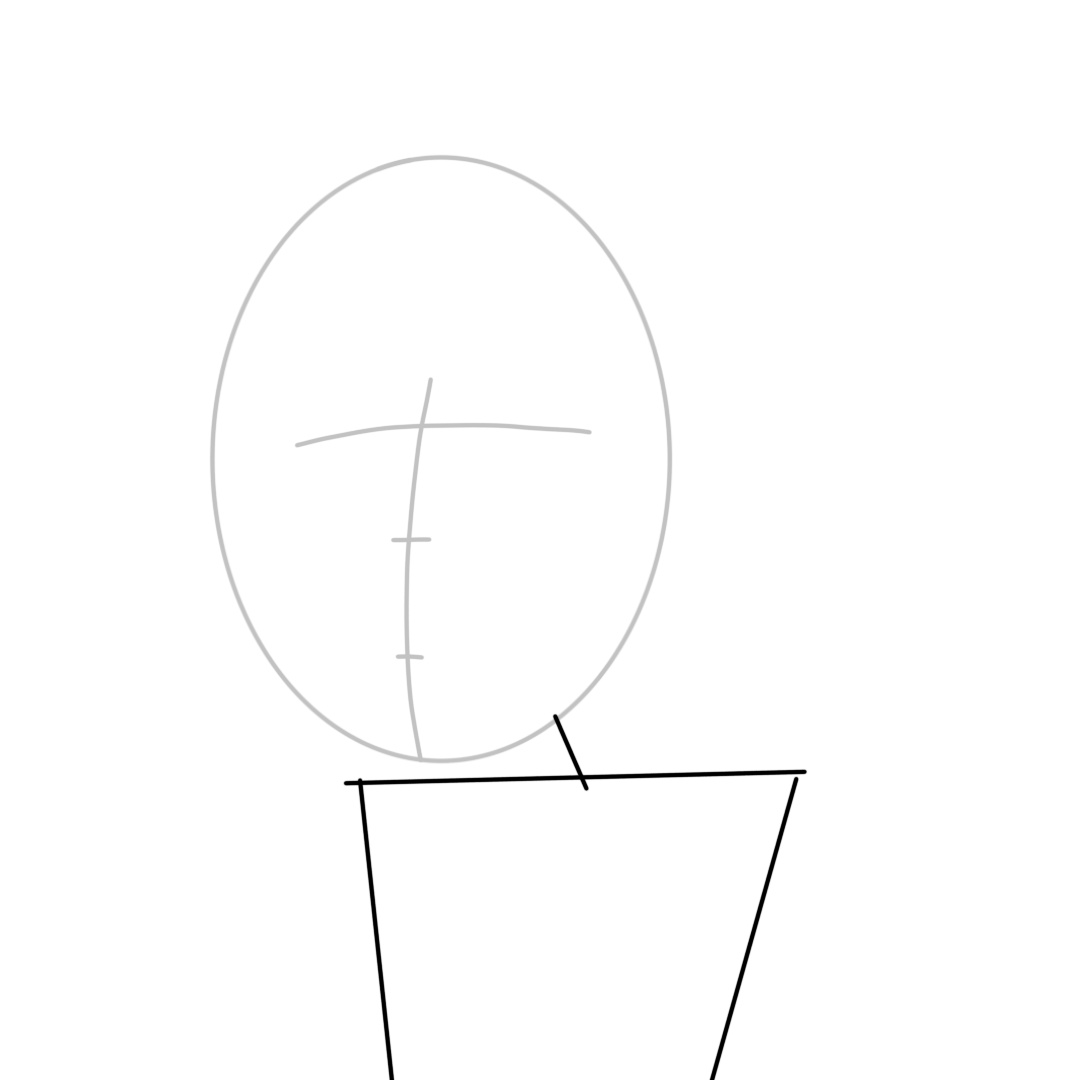
I believe “a well-structured drawing is a successful artwork” therefore, you need to outline the body of your character so you can go ahead.
For this particular article, I will be showing you how to draw Kanta Ogaki upper body in a new method which I am very sure you haven’t seen before; this upper part of Kanta’s body entails the head, upper arms, face cap, his outfit and many more,
Now that you already have the shape of the head sketched out, which carries 50% of the drawing because of the size of the head.
Draw Kanta’s chest under the oval shape of the head and later join the chest to the head by making the neck so that you can have a perfect look at your drawing. If you are yet to outline the body, go back and do that so you won’t be left out.
Outline Kanta’s Shoulder
Kanta’s shoulder is connected to the neck and also serves as the first step of drawing the arms because Kanta’s arms are attached to his shoulder.
We will be drawing Kanta in a way that he will be facing the right side of the body; so, draw the shoulder by making a slant line under the oval shape of the head and ensure there is enough gap between the head and the shoulder so that you can easily fix the neck.
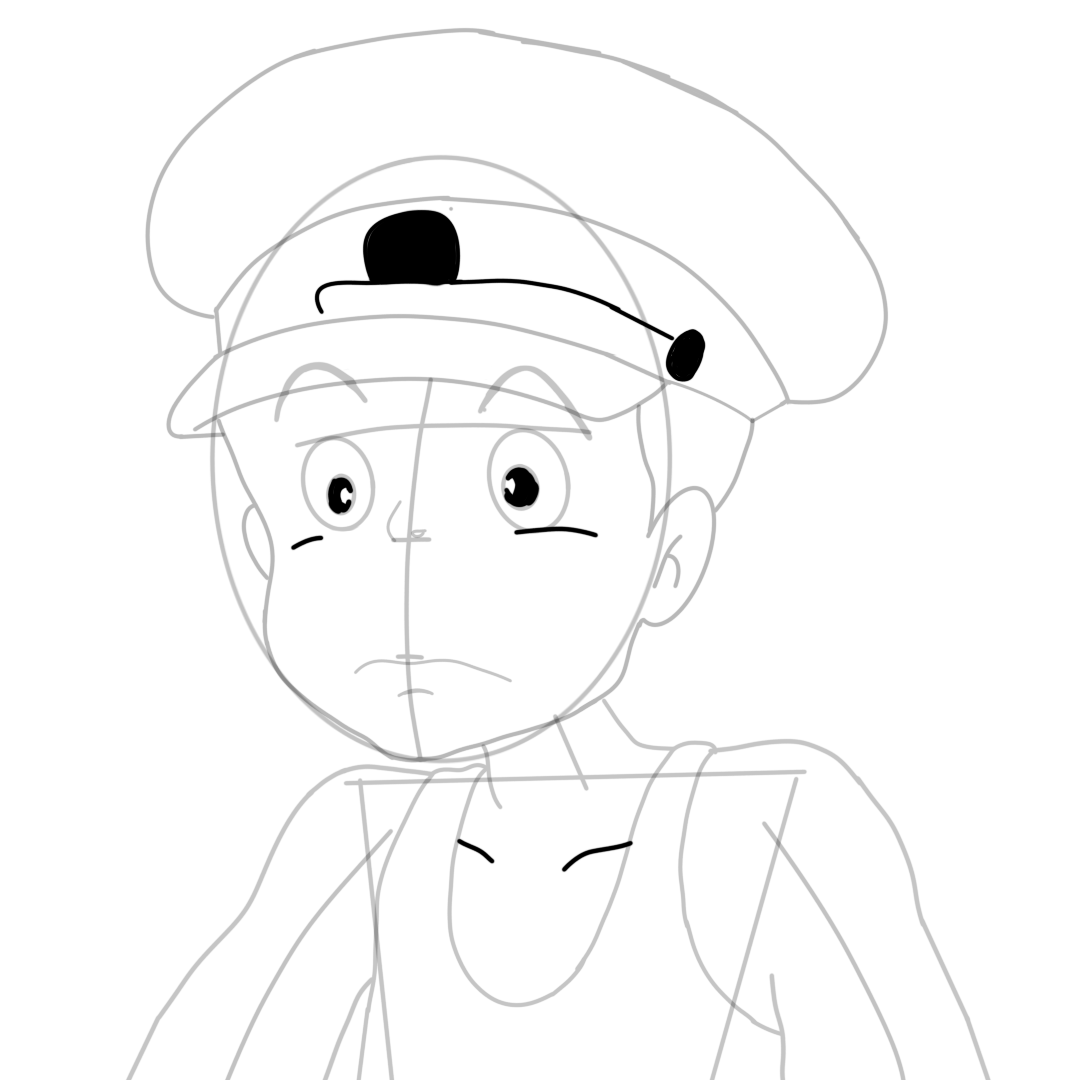
Draw Kanta’s Eyes, Nose, and Mouth
Now it is time to add facial features.
We’ll begin by drawing Kanta’s eyes; draw circles that are not too small nor too big for the shape of the eyes; the eyes should be oval.
Add another oval shape inside the shape of the eyes, but this time a smaller oval shape so that it serves as the pupils of the eyes, and you can also decide to make another circle overlapping (beside) the inner oval shape (pupils) of the eyes, so it makes it more pragmatic. That is not all, and there is still more!
Draw Kanta’s eyebrows by making a concave curve above the oval shape of the eyes; you can use a thick line for the eyebrow.
For the upper eyelids, add a concave curve at the top of the shape of the eyes which is in alignment with the oval shape, and for the lower eyelid, draw a horizontal line under the shape of the eyes so that it is also aligned to the oval shape of the eyes.
Ensure the shape of his eyes is in the right position so that the horizontally curved line you drew as the basis is used to align the eyes.
For Kanta’s nose, don’t overwork yourself for this step; make a little curved line at the right side of the vertically curved line of the head and add a little horizontal line to it so it forms the natural shape of the nose.
I believe you already know the position of the nose; the nose is below the eyes and above the mouth.
For Kanta’s mouth, make a little wide curved line that slightly looks like the letter “m” above the little horizontal line you drew for the basis of the mouth, and add another little horizontal line under the basis of the mouth so that the horizontal line of the basis is at the middle of the shape of the mouth.
If you carefully follow these approaches by now, you should have Kanta’s eye, nose, and mouth fixed with ease, but if you’ve not done that, there is still a chance for you to do that so you can finish your drawing on time.
Draw the Face Cap of Kanta Ogaki
One of the interesting features of Kanta’s outfit is the face cap he uses, which helps to complement his outfit. The face cap covers the upper part of the head.
For the upper part of the face cap, draw a concave curve above the head so that there is space or gap between the concave curve and the head, and draw a horizontally curved line above the head but this time a bit closer to the head so that the horizontally curved line joins the ends of the concave curve above the head.
For the lower part of the face cap; draw a little slant line from the joint of the upper part so that the slant line is in alignment with the direction of the head, and join the ends of these slant lines with another horizontally curved line that crosses the top of the head.
Complete the face cap by making a slant line from the right joint of the horizontally curved line that crosses the head so that the slant line is pointing in the right direction of the body.
Make another diagonal line form the lower part of the horizontally curved line (left side) that crosses the top of the head, which is also pointing towards the direction of the head, and join these slant lines together with a horizontally curved line in alignment to the position of the head.
Kanta Ogaki Jaw and Ears Drawing
Yes! You are almost. For this step, I will show you how to draw the jaw and ear.
Now draw the shape of the jaw at the lower part of the head so that it’s joined to the end of the curved line you drew at the right side of the face.
For Kanta’s ears, draw a little curve for the right ear; due to the direction Kanta is facing, the right ear can not be seen, while for the left ear; make a curve of the size of the ear so at the left side of the head so that the lower end of the ear is attached to the jaw.
Finish up this by drawing a line from the slant line of the face cap (left side of the cap) to the upper end of the curve of the left ear and another line from the joint of the horizontally curved line of the cap to the body of the left ear so that the left view of Kanta’s head can be more realistic.
How to Draw Kanta Ogaki Outfit
Let’s add the neck then the outfit follows. Make slant lines under the jaw pointing towards the direction of the shoulder, so these slant lines serve as the neck.
For the outfit; make a curved line from the slant lines of the neck to form Kanta’s upper arms, draw a vertically curved line from the shoulder part of the arms, and draw a convex curve that looks like the letter “U,” which ends are attached to the shoulder on Kanta’s chest; this is the round shape of the outfit.
You can now draw a line from the outfit so it is pointing towards the arms’ direction so that the arms’ shape can look more natural.
Add Details to the Kanta Ogaki Drawing
Adding details to your drawing is very important because, in this step, you have a better view and full knowledge of what parts of the body or outfit are missing, and if there is a need to remove some parts, you can also do that here.
Draw the design on the face cape by adding a curved line and circles to the cap and add a few lines to the face, so it adds more detail to Kanta’s face.
Shade the pupils of the eyes and the circles of the design of the face cap; you can as well shade the mouth to add focus to the expression of the mouth.
Trace out the border of the outline and outfit and erase all the excess lines and dots on the drawing so your drawing can look better.
Add Colors to the Kanta Ogaki Drawing
Do you want to make your drawing presentable?
If yes, there is no other charm to that rather than adding beauty to your drawing by using your favorite color. Color makes drawing attractive to people, so use a nice color for the outfit and the outline.
You can also add shadows or exposures to your drawing, giving it a 3D look and making it look more natural.
Conclusion
In conclusion, we have reached the end point of the tutorial, and it’s another good work you have done; as I said earlier, I hope this article is helpful and will help you to improve your drawing skills.
I am sure you will consider yourself lucky because you found this post. Get your drawing materials ready and try these steps out if you are yet to do that. Have fun!


")
")