Do I have your attention? I will show us how to draw Tatsuo today. Tatsuo Kusakabe is the father of Mei and Satsuki Kusakabe and the husband of Yasuko Kusakabe for My Neighbor Totoro.
Tatsuo is a university professor specializing in woodworking, and he is very kind and patient, especially with his daughters. This article will show you how to draw Tatsuo Kusakabe from My Neighbor Totoro.
Outline the Head of Tutsuo Kusakabe
Contents
So here we go!
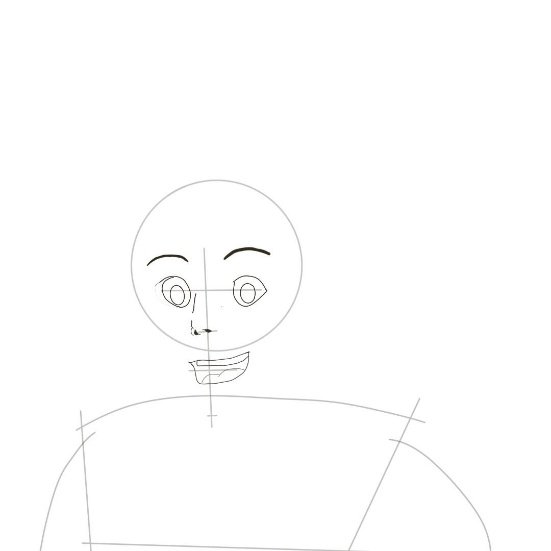
Begin with Tutsuo Kusakabe head drawing; draw a circle that should be perfect in shape and ensures the circle is not too big nor too small for the features of the head to be fixed with ease.
Make a vertical line inside the circle and a horizontal line crossing the vertical line so that it forms a cross shape inside the circle of the head; these lines will be used to fix the facial features when it’s time.
Draw another vertical line under the circle of the head, so it looks like the continuation of the line inside the head, and add a horizontal line to the vertical line so it also crosses the vertical line and forms another cross pattern under the circle of the head; this will be used to make Tatsuo’s jaw and other features of the face.
Outline the Body of Tutsuo Kusakabe
There is a need to outline the body of your character before drawing so you can know your limits and expectations and finish on time.
For this article, I will teach you how to draw the upper part of Tatsuo’s body, including his outfit. I am sure you are excited because it is exactly what you want. Now that you have the head and the basis to fix the jaw, you can go ahead to draw the Tatsuo’s body shape.
You will have to make a horizontally curved line at the lower part of the jaw; this horizontally curved line serves as Tatsuo’s shoulder.
Let me show you the magic, make a vertical line on the right side of the shoulder and a slant line on the left side to show the direction of Tatsuo’s body.
Finish up the body’s shape by joining the vertical line to the slant line with a perfect horizontal line, which is Tatsuo’s chest.
Outline Tatsuo’s Hands
The next step for this drawing is to outline the hands. Tatsuo has two hands, the left, and the right, and his hands are attached to the vertical and slant lines that make up the body.
Make a curved line at the sides of the body so it’s pointing downward, which is all for the hands.
Since you already have the head, body, and hands outlined, you can now start adding the facial features in alignment with the already existing basic line you drew for the facial features.
Draw Tatsuo’s Eyes, Nose, and Mouth
For this facial feature, you should start with the eyes, and then others follow.
For the eyes, draw circles which is not perfect on the horizontal line of the head so that the vertical line is in the middle of these circles of the eyes; make another small circle inside the shape of the eyes, but this time an oval shape so it serves as the pupils of Tatsuo’s eyes.
To draw Tatsuo’s eyebrow, make a slightly flat-concave curve above the circle of the eyes which you can use a thick line.
For Tatsuo’s nose, the nose is under the eyes, then make two dots under the eyes (on the vertical line) so that it’s aligned to the vertical line of the head and also facing the direction of the head.
To draw Tatsuo’s mouth, draw a convex curve under the circle of the head (on the line of the jaw) and a horizontally curved line at the top of the convex curve. Add random lines inside the shape of the mouth so that it portrays the expression of his mouth.
Draw Tatsuo’s Jaw and Ear
In continuation of the features of the head, you will have to draw the jaw and ears.
Draw the ears before the jaw, so you won’t have problems fixing the jaw later on.
Add a little curve at the right side of the circle of the head and make a perfect curve of the ear on the left side of the head; add a curve inside the shape of the left ear and add more lines to the ear to make it more realistic.
For Tatsuo’s jaw, draw the shape of the jaw around the mouth so that it’s aligned with the vertical line under the circle of the head while minding the look of the chin pointing to the direction of the head.
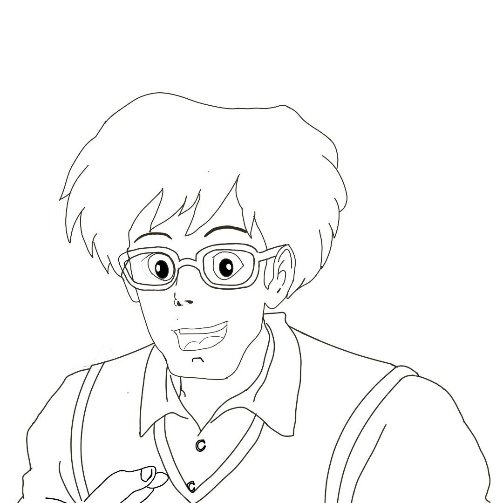
Tatsuo Kusakabe Hair Drawing
Let me show you the amazing way of drawing Tutsuo Kusakabe hair.
Firstly, you must understand that his hair is connected to the ears with a zigzag line. Draw a curved line at the top of the circle of the head and extend the ends of these lines towards the direction of the head.
Continue the extended line with a zigzag line till it reaches the point of the ears so that the zigzag line is curved towards the ears.
Complete Tatsuo’s hair by drawing the hair on his forehead; make a curved line from the left side of the head (above the eyebrow) to the top of the vertical line of the head, and make a zigzag line from the joint of the curved line and vertical line of the head so that the zigzag line has edges and curved towards the right ear.
Make another zigzag line from the top of the curved line above the left eyebrow, which is curved towards the left ear.
Draw the Collar of Tatsuo’s Shirt
Now we are done with the basic parts of the body, you can now fix the outfit by beginning with the collar of Tatsuo’s shirt.
Draw curved lines from the sides of the jaw towards the direction of the chest, and draw curved lines from the chin part of the jaw so that it forms a “V” neck pattern at the upper part of the chest.
To complete the collar of the shirt, join the ends of the curved line on the upper part of the chest to the sharp edge of the “V” shape of the collar, and that’s all for the collar of his shirt.
Draw Tatsuo’s Outfit and Its Sleeves
Draw the body of Tatsuo’s outfit, including the sleeves.
Recall I told you we’ll focus on the upper part of the body; therefore, the outfit will only be for the upper part of Tatsuo’s dress.
Add the sleeves of the outfit so that the body of the dress won’t give you a problem; draw a curved line from the left side of the collar of the shirt so that it points towards the direction of the left arm; this is for the left sleeve and the right sleeve, draw a curved line from the right side of the jaw so that the line is extended towards the direction of the right arm.
Ensure the ends of these sleeves are not smooth; make them slightly rough by ending the sleeves with a zigzag line.
For the body of the outfit, draw doubled curved lines from the shoulder of the sleeves so that it’s curved towards the left direction of the body and resting on the perfect horizontal line you drew for the chest; this makes the sleeves of the outfit more realistic.
That’s not all, and there is more!
Draw the upper part (neck) of the jacket he’s wearing, make curved lines from the collar of the shirt so that these lines form an edge pointing towards the direction of the perfect horizontal line of the chest, and draw another curved line beside the last lines so that it makes the upper part of the jacket realistic while this last curved line is resting on the horizontal line of the chest.
The curved lines of the jacket should also form an incredible “V” shape towards the shirt’s collar.
Draw Tatsuo Eyeglasses
Don’t be surprised, Tatsuo wears glasses making him look like a perfect university lecturer; he wears eyeglasses that complete his outfit.
To draw Tatsuo’s eyeglasses, make a circle on the shape of the eyes so that the circle covers the whole of the eyes, make a concave curve over the circle of the glasses and join the concave curve together with a little horizontally curved line crossing the vertical line of the head.
Draw a convex curve under the circle of the glasses and join the convex curves with a horizontally curved line, forming the natural shape of the glasses in alignment with the shape of the eyes.
Because Tatsuo is slightly facing the right direction, you can only draw the left part of the glasses. Draw a slant line from the end of the concave and convex curve of the glasses towards the direction of the left ear while you join the concave and convex curve of the right side of the glasses together with a little curve, so it makes the eyes glasses perfect.
Add Details to the Tatsuo Kusakabe Drawing
Start by adding details to the outfit; draw the shirt’s button by making little circles under the edge of the “V” shape of the shirt’s collar.
Add a little curved line under the shape of the mouth to make it real, and add more lines to the sides of the outfit if needed.
Use thick lines to trace out the border of the outlines and outfit.
Erase all excess lines and dots that won’t make Tatsuo’s drawing come out good.
Shade the pupils of the eyes and add a curved line to the mouth for the shape of the Tatsuo’s tongue and another curved line at the top for the shape of the teeth.
Add colors to the Tatsuo Kusakabe Drawing
Now that you are done adding details to the Tutsuo Kusakabe drawing, it’s time to make the drawing attractive by adding suitable colors to Tatsuo in order to make it more presentable; use black color for the border of the glasses, grey color for his hair, white color for his shirt and the appropriate color for the jacket.
Do you know you can make your drawing cool by adding shadows to the Tutsuo Kusakabe drawing? Try it out by adding shadows and highlighting the necessary part of the body and outfit; you will be perplexed by your result after this.
Conclusion to Tatsuo Kusakabe Drawing
That’s all, my friend. It’s time to be proud of your drawing skills as you have learned everything you need to draw Tatsuo.
You are now equipped with everything to draw him, and you’ve improved your skill on how to draw other amazing anime characters.
Make sure you practice as much as possible until you make this art an easy art for you.
Remember to take your time and be patient for good results; keep up the fun of learning how to draw characters until it becomes your passion. Have fun!


")
